


Troubleshooting
8 309977H
Troubleshooting
Relieve pressure; page 6.
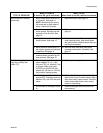
MOTOR WON’T OPERATE.
TYPE OF PROBLEM
WHAT TO CHECK
If check is OK, go to next check
WHAT TO DO
When check is not OK, refer to this column
Basic Fluid Pressure Prob-
lems
1. Pressure control knob setting.
Motor will not run if at minimum
setting (fully counterclockwise).
1. Slowly increase pressure setting to see if
motor starts.
2. Spray tip or fluid filter may be
clogged.
2. Relieve pressure and clear clog or clean
filter; refer to separate gun or tip instruc-
tion manual.
Basic Mechanical Problems 1. Pump (31) for frozen or hardened
paint.
1. Thaw sprayer if water or water-based paint
has frozen in the sprayer. Place sprayer in
warm area to thaw. Do not start sprayer
until thawed completely. If paint hardened
(dried) in sprayer, replace pump packing.
See Pump Repair, page 20.
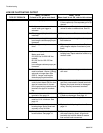
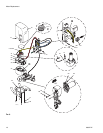
2. Displacement pump connecting
rod pin (75). Pin must be com-
pletely pushed into connecting
rod (45) and retaining spring (76)
must be firmly in groove of pump
pin. See Fig. 9.
2. Push pin into place and secure with spring
retainer.
3. Motor (33). Remove drive hous-
ing assembly (37). See page 15.
Try to rotate fan by hand.
3. Replace motor (33) if fan won’t turn. See
page 15.
Basic Electrical Problems 1. Motor control board. Board shuts
down and displays error.
1. See Motor Control Board Diagnostics,
page 17.
2. Electrical supply. Meter must
read: 210-255 Vac for 220-240
Vac models; 85-130 Vac for
100-120 Vac models.
2. Reset building circuit breaker; replace
building fuse. Try another outlet.
3. Extension cord. Check extension
cord continuity with volt meter.
3. Replace extension cord.
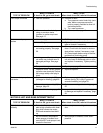
4. Sprayer power supply cord.
Inspect for damage such as bro-
ken insulation or wires.
4. Replace power supply cord.
5. That motor leads are securely
fastened and properly mated.
5. Replace loose terminals; crimp to leads.
Be sure terminals are firmly connected.
Clean circuit board terminals, Securely
reconnect leads.
6. For loose motor brush lead con-
nections and terminals. See
page 14.
6. Tighten terminal screws. Replace brushes
if leads are damaged. See page 15.