


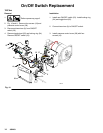

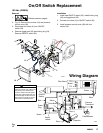
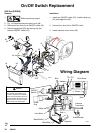

13309063
Motor Brush Replacement
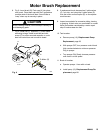
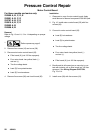
6. Fig. 9. Insert brush (B). Push cap (A) into place
over brush. Orient each cap with the 2 projections
on either side of the brush lead. You will hear a
“snap” when cap is securely in place.
CAUTION
When installing brushes, follow all steps carefully to
avoid damaging parts.
7. Fig. 9. Install red (+) and black (--) motor leads
according to tags. Install brush lead end with
screw (C) to motor-mounted capacitor or route
lead into control box and connect to board.
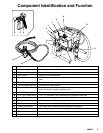
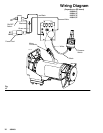
C
E
Fig. 9
A
TI0053
B
C
ti7479a
To Motor (D)
8. If replacement brush harness has 2 yellow wires
(C), cut, strip, and crimp the 2 yellow wires (D)
from the motor and butt splice (E) on the replace-
ment harness.
9. Inspect commutator for excessive pitting, burning
or gouging. A black color on commutator is normal.
Have commutator resurfaced by a motor repair
shop if brushes wear too fast.
10. Test brushes.
a. Remove pump (13); Displacement Pump
Replacement, page 26.
b. With sprayer OFF, turn pressure control knob
fully counterclockwise to minimum pressure.
Plug in sprayer.
c. Turn sprayer ON. Slowly increase pressure
until motor is at full speed.
11. Break in brushes.
a. Operate sprayer 1 hour with no load.
b. Install pump (13); Displacement Pump Re-
placement, page 26.