


23309063
Pressure Control Repair
For these models and series on ly:
232900 F
232901 E
233797 E
233815 E
Pressure Control
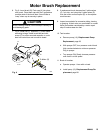
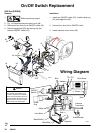
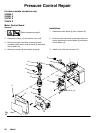
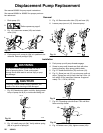
Removal (See Fig. 15)
1.
Relieve pressure; page 6.
2. Remove 4 screws (17) and control cover (16).
3. Disconnect pressure control connector from con-
trol board (8).
4. Remove clip (13) from control knob (14). Slide
knob (14) off of pressure control (12) and remove
knob (14) and baffle (14a) from control box (1).
5. Disconnect high pressure hose at pump.
6. Remove 2 screws (2) from fluid manifold and
remove manifold from sprayer.
7. Remove pressure control (12) from fitting (11).
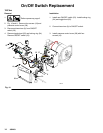
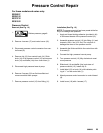
Installation (See Fig. 15)
NOTE: The pressure control has been preset at the fac-
tory to the design stall pressure.
1. Apply red thread locking adhesive (provided in kit)
to the brass threads of the pressure control (12).
2. Assemble pressure control (12) into fitting (11) and
torque to 140 in. lbs (12 ft. lbs). Do not pinch or
damage the wires on the pressure control.
3. Assemble the fluid manifold to the control box with
2 screws (2).
4. Connect the high--pressure hose at pump.
5. T urn pressure control (12) fully clockwise to maxi-
mum pressure.
6. Slide knob (14) and baffle (14a) onto stem of
pressure control (12). Install clip 13.
7. Install label (15) on knob (14) with indicator point-
ing at “+” on the control box (1).
8. Attach pressure control connector to control board
(8).
9. Install cover (16) with 4 screws (17).