


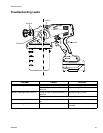

Troubleshooting
30 3A2589D
Spray pattern has tails:
Pressure control knob is too low. Turn up pressure control knob.
Incorrect spray tip for application of
material.
See Choosing the Correct Tip, page 12.
Material not compatible with sprayer. Switch to compatible material.
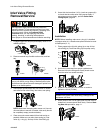
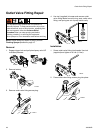
Inlet or outlet valve fitting is worn. See Outlet Valve Fitting Repair, page 26 and
Inlet Valve Fitting Removal/Service, page
25.
Spray pattern has dripping:
Sprayer is moving too slow for material. Move sprayer faster while spraying.
Sprayer is too close to target surface. Move sprayer away from surface 10 in. (25
cm)
Holding trigger while changing spray
direction.
Release trigger when changing directions.
Incorrect spray tip for application of
material.
See Choosing the Correct Tip, page 12.
Pressure control knob is set too high. Turn down pressure control knob.
Spray tip is worn or damaged. Replace spray tip. See Install Spray
Tip/Guard Assembly, page 13.
Spray pattern is too narrow:
Sprayer is too close to target surface. Move sprayer away from surface 10 in. (25
cm)
Incorrect spray tip for application of material. See Choosing the Correct Tip, page 12.
Spray tip is worn or damaged. Replace spray tip. See Install Spray
Tip/Guard Assembly, page 13.
Spray pattern is too wide:
Sprayer is too far away from target surface. Move sprayer closer to surface.
Incorrect spray tip for application of material. See Choosing the Correct Tip, page 12.
Spray pattern “spits” at the end
or beginning:
Excess material has accumulated on
spray/tip guard assembly.
See Shutdown and Cleaning, page 15.
Spray tip filter is partially clogged or dam-
aged.
Clean or replace filter. See page 14.
Spray tip/guard assembly not threaded com-
pletely onto sprayer.
See Install Spray Tip/Guard Assembly,
page 13.
Seat is worn. Replace spray tip/guard assembly.
Spray tip continues to drip or
ooze material after trigger is
released:
Spray tip filter is partially clogged or dam-
aged.
Clean or replace filter. See page 14.
Spray tip/guard assembly not threaded com-
pletely onto sprayer.
See Install Spray Tip/Guard Assembly,
page 13.
Seat is worn. Replace spray tip/guard assembly.
If the three solutions above do not solve the problem, replace needle assembly.
Problem Cause Solution
ti15526a
ti15523a
ti15523a
ti15527a
ti15527a
ti15525a
ti15525a