


12308-341
Setup
and Shutdown
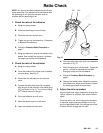
6. Adjust the spray pattern. (continued)
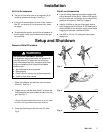
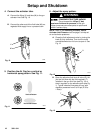
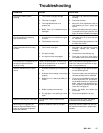
F. Set
the gun air supply pressure at 40 psi
(2.8 bar), using the gun atomizing air regulator
(E). See Fig. 18.
NOTE:
D
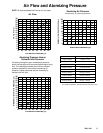
Use the fluid manufacturer recommendations if
available and refer to the
Atomizing Pressure
V
ersus Activator Inlet Pressure
chart on
page 5 when adjusting the gun.
D
Local laws may limit the maximum pressure to
10 psi (0.7 bar) at the air cap for HVLP com
-
pliance.
Fig. 18
E
01997
G.
Hold the gun about 6 to 8 inches (150 to
200 mm) from the test piece and test the spray
pattern and atomization.
H.
The spray pattern may be too wide with the
pattern adjustment knob (13a) fully open. T
urn
the pattern adjustment knob clockwise until
you have the desired pattern size. See Fig. 17,
page 1
1.
NOTE:
Some
pattern air is required to supply the
activator; do not close the pattern adjustment knob
completely.
I.
Check the atomization quality again. If neces
-
sary
, increase the gun air supply pressure with
the air regulator (E) in 5 psi (0.35 bar) incre
-
ments until you have the desired atomization.
J.
If the atomization is still unacceptable, install a
larger fluid nozzle size to reduce the fluid
stream. Refer to Fig. 15. See page 8 to
remove and install a fluid nozzle.
K.
Repeat steps 6.E to 6.J until you have the
desired spray pattern and atomization.
NOTE:
T
o eliminate a fan pattern at low atomizing
pressures, it may help to remove the activator air
restrictor (55). See Fig. 34, page 19.
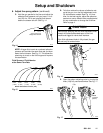
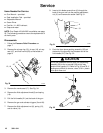
7. Adjust the activator fluid flow.
CAUTION
When
the activator is being supplied to the gun, the
atomizing air must be on before triggering the gun to
avoid contaminating the atomizing air with activator
.
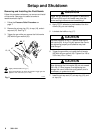
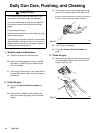
Open the activator supply valve (L) and increase
the fluid pressure until the desired amount of acti
-
vator is sprayed with the adhesive. The typical fluid
pressure range is 8 to 20 psi (0.56 to 1.40 bar).
See
Ratio Check
, page 13.
Fig. 19
L
02776
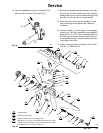
8. Shut down the system at
the end of the
work-shift and before checking, adjusting, cleaning
or repairing the system. Follow the
Pressure Re
-
lief Procedure
on page 7.
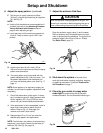
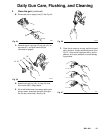
9. Place the gun nozzle in soapy water
over-night
to avoid having the tip clog with
hardened material. Do not immerse the entire gun.
Fig. 20
02785