


20 308741
Service
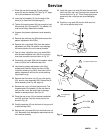
22. To tighten the packing screw (8), turn the screw in
until it touches the fluid packings (5), then tighten
one full turn to pre-set the packings. Loosen the
screw, then turn it in until it touches the packings
again. Tighten the screw 1/12 turn more (equal to
half the distance between points on the hex head).
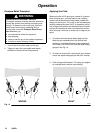
23. Trigger the gun to test the needle movement. If the
needle does not return after the trigger is released
or is slow in returning, loosen the packing screw
(8) slightly until the needle returns freely.
24. Install the air cap (14) and air cap retaining ring
(15). Hand-tighten the ring.
25. Make sure the gun fluid packings are sealing
properly by spraying solvent at low pressure
before fully pressurizing the gun with the fluid to be
sprayed.
If the fluid packings leak, tighten the packing screw
(8) slightly and retest until the packings and needle
seal completely.
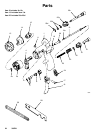
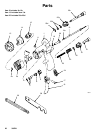
Complete Gun Packing Replacement
WARNING
PRESSURIZED EQUIPMENT HAZARD
To reduce the risk of a serious injury, follow the
Pressure Relief Procedure on page 12 before
checking or repairing any part of the gun or sys-
tem.
NOTE:
D Gun Repair Kit 239639 is available. The kit includes
an o-ring (2b), fluid packing kit (5), u-cups (16, 20,
25b), and air valve assembly (26).
D Clean parts with a solvent that is compatible with
the parts and the fluid being sprayed.
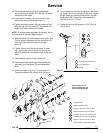
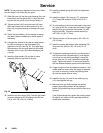
D Lightly lubricate the parts indicated in Fig. 28 with
lubricant 111265.
1. Relieve the pressure.
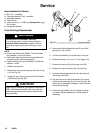
2. Remove the air cap retaining ring (15) and air cap
(14). See Fig. 26, page 18.
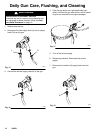
3. Trigger the gun while you remove the fluid nozzle
(12) with the gun tool (28).
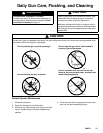
CAUTION
Trigger the gun whenever you tighten or remove the
nozzle. This keeps the needle seat away from the
nozzle seating surface and prevents the seat from
being scratched.
4. Remove the fluid adjustment knob (21) and fluid
spring (23). See Fig. 28, page 19.
5. Pull the fluid needle (13) out the back of the gun.
6. Remove the screw (11), pin (17), and trigger (10).
7. Remove the hex nut (9) with the gun tool (28).
8. Remove the spray housing (2a) and insert (4).
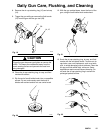
Remove the o-ring (2b) with a pick and install the
new o-ring.
To ease o-ring installation, place the insert (4) into
the spray housing (2a) to plug the end. Install one
end of the o-ring into the groove in the housing,
then press the rest of the o-ring into place.
9. Unscrew the packing screw (8) from the insert (4)
with the gun tool (28).
10. Use the back end of the fluid needle (13) to push
the three fluid packings (5) out of the insert (4). Be
careful not to damage the needle or insert. Discard
the old fluid packings.