


22 308741
Service
NOTE: To ensure proper alignment of the parts, follow
the next steps in the order they are given.
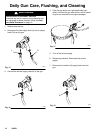
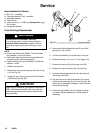
27. Slide the insert (4) into the spray housing (2a), and
install them onto the gun body (1). Align the hous-
ing with the slot and lip (A) on the gun body (1).
28. Tighten the hex nut (9) onto the insert (4) hand-
tight, then loosen the nut about one turn so the
insert (4) and spray housing sit loosely in the gun
body.
29. Check the fluid needle (13) for damage or exces-
sive wear. Replace needle tip or entire needle if
necessary.
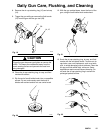
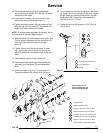
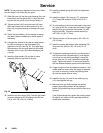
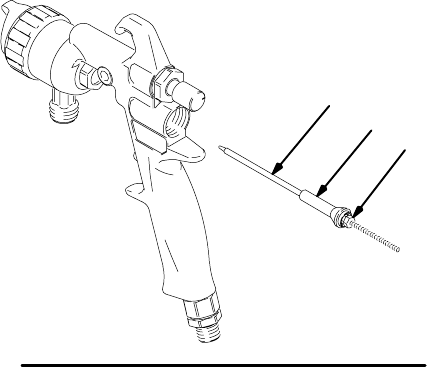
30. Lubricate the outside of the new air valve assem-
bly (26) and place it on the fluid needle (13),
against the nut (B). See Fig. 32. This helps align
the entrance of the air valve stem into the inside
diameter of the u-cup (16) without damaging the
u-cup lip.
31. Install the fluid needle (13) and the air valve
assembly (26) into the back of the gun.
Fig. 32
13
26
B
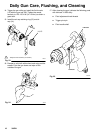
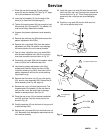
32. Install the air valve spring (22). Point the gun down
to center the spring (22) and tighten the fluid nut
(19) to 125–135 in-lb (14–15 NSm).
33. Install the needle spring (23) and fluid adjustment
knob (21).
34. Install the trigger (10), pivot pin (17), and screw
(11). Torque the screw to 20–30 in-lb (2.3–3.4
NSm).
35. To avoid galling of the fluid nozzle seat in the insert
(4), apply a thin film of lubricant to the seat. Trigger
the gun while you install the fluid nozzle (12) with
the gun tool (28). Torque the nozzle securely to
145–155 in-lb (16–17 NSm).
36. Tighten the hex nut (9) securely to 125–135 in-lb
(14–15 NSm).
37. Install the pattern adjustment valve assembly (25).
Torque the nut (25a) to 125–135 in-lb (14–15
NSm).
38. To tighten the packing screw (8), turn the screw in
until it touches the fluid packings (5), then tighten
one full turn to pre-set the packings. Loosen the
screw, then turn it in until it touches the packings
again. Tighten the screw 1/12 turn more (equal to
half the distance between points on the hex head).
39. Trigger the gun to test the needle movement. If the
needle does not return after the trigger is released
or is slow in returning, loosen the packing screw
(8) until the needle returns freely.
40. Install the air cap (14) and air cap retaining ring
(15). Hand-tighten the ring.
41. Make sure the gun fluid packings are sealing
properly by spraying solvent at low pressure
before fully pressurizing the gun with the fluid to be
sprayed.
If the fluid packings leak, tighten the packing screw
(8) slightly and retest until the packings and fluid
needle seal completely.