


14 308936
Gun Setup
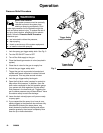
10.Install the pre-orifice
WARNING
To reduce the risk of a serious injury, including fluid
injection, follow the Pressure Relief Procedure on
page 10 when you stop spraying and whenever you
are instructed to relieve the pressure.
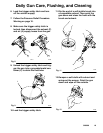
A. Place the spray tip seal (9a) on a flat surface.
B. Note that the hole through the pre-orifice (9b) is
larger on one side than the other.
C. Place the pre-orifice (9b), with its larger hole facing
up, on top of the tip seal (9a) hole.
D. Use a large, flat object to press the pre-orifice (9b)
into the tip seal (9a).
Fig. 10A–D
8799A
9a
9b
PRESS DOWN
with a large, flat
object
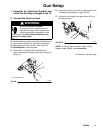
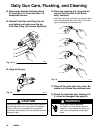
E. Turn over the tip seal and pre-orifice (9a, 9b) and
insert them into the spray tip (9), wih the pre-orifice
side facing down into the spray tip.
Fig. 10E
8799A
9
9a, 9b
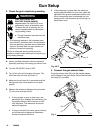
11. Install the spray tip
WARNING
To reduce the risk of a serious injury, including fluid
injection, follow the Pressure Relief Procedure on
page 10 when you stop spraying and whenever you
are instructed to relieve the pressure.
A. Make sure there is no pressure in the system
before removing or installing a spray tip. Relieve
the system pressure.
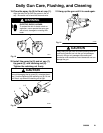
B. Place the spray tip (9) in the air cap (1), aligning
the tab of the tip with the groove in the air cap.
Be careful not to bend the electrode wire (1a).
Fig. 11B
8800A
9
1
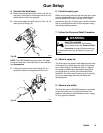
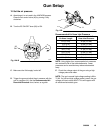
C. Install the spray tip (9) and air cap (1), tip guard
(2), and retaining nut (8) onto the gun; tighten the
retaining nut firmly.
WARNING
FIRE, EXPLOSION, AND
ELECTRIC SHOCK HAZARD
To reduce the risk of fire, explosion, and
electric shock, never operate the spray
gun with a bent, damaged or missing
electrode (1a).
8
02088B
2
1, 9
Fig. 11C