


308936 39
Service
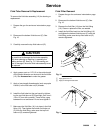
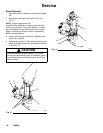
Air Valve Repair
1. Prepare the gun for service as instructed on page
28.
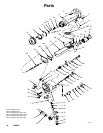
2. Using a screw driver, remove the air valve cap
(45). See Fig. 20.
3. Remove the o-ring (23) and spring (44).
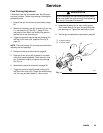
CAUTION
Clean all parts in non-conductive solvent compatible
with the fluid being used, such as xylol or mineral
spirits. Use of conductive solvents can cause the gun
to malfunction.
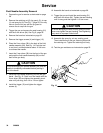
4. Loosen the air valve packing nut (40) one full turn,
then remove the air valve shaft (39).
CAUTION
When removing the air valve shaft (39) be careful not
to damage the seat area.
5. Check the o-rings (41, 23) for damage and replace
if necessary. Apply petroleum jelly to the o-rings.
6. Unscrew the packing nut (40) to check the u-cup
(42). Do not remove the u-cup unless it is dam-
aged. If the u-cup (42) is removed, be sure to
install the air valve shaft (39) into the handle
before installing the packing nut and u-cup.
7. Install the air valve shaft, with the o-ring (41) into
the back of the gun handle (7).
8. If removed, install the u-cup with its lips facing into
the gun handle.
9. Tighten the air valve packing nut (40) until it bot-
toms.
10. Install the spring (44), o-ring (23) and air valve cap
(45). Tighten the air valve packing nut (40).
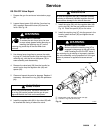
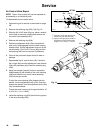
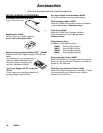
Fig. 20
41
39
44
40, 42
23
7
02014A
45
Lubricate o-rings with petroleum jelly
Do not remove u-cup (42) unless damaged. Install with lips
facing into handle.