


308936 33
Service
Fluid Packing Adjustment
If fluid leaks from the fluid needle area, the fluid pack-
ings may be loose. Tighten the packings, following the
procedure below.
1. Prepare the gun for service as instructed on page
28.
2. Remove the retaining nut (8), tip guard, (2), air cap
(1), and spray tip (9). See Fig. 7, page 29. You
may have to turn the air cap with the tip guard to
remove the air cap from the gun.
3. Trigger the gun and remove the seat housing (21)
with the 9 mm driver (64), supplied. See Fig. 8,
page 29.
NOTE: The seat housing (21) must be removed before
adjusting the fluid packings.
4. Remove the barrel as instructed on page 32.
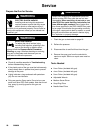
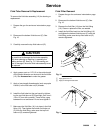
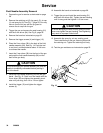
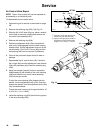
5. Place the 2 mm driver (58), supplied, in the back
of the fluid needle assembly. Push the tool in and
turn it clockwise, slightly, to tighten the packings.
See Fig. 14.
6. Assemble the barrel as instructed on page 36.
7. Trigger the gun and install the seat housing (21)
with the 9 mm driver (64). Tighten the seat housing
until it’s snug and then tighten it 1/8 turn more.
CAUTION
To avoid damaging the seat housing and gun barrel,
never over-tighten the seat housing. Over-tightening
may result in improper fluid shut-off.
8. Assemble the spray tip, air cap, and tip guard.
Then install them on the gun, securing them with
the retaining nut. Tighten the retaining nut firmly.
9. Test the gun resistance as instructed on page 25.
Fig. 14
58
02015
To tighten packings
To remove needle