


G0492 12" X 36" Combo Lathe/Mill
-17-
Mounting the Chuck
and the Faceplate
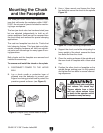
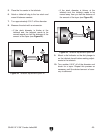
3. Use a 14mm wrench and loosen the three
hex bolts that secure the chuck to the spindle
Figure 10.
4. Support the chuck, and while anticipating the
heavy weight of the chuck, remove the three
hex bolts and then the chuck.
5. Clean the mating surfaces of the spindle and
the new chuck or faceplate with a clean oiled
rag.
6. Position the other chuck or faceplate on the
spindle flange, making sure it is fully seated,
and tighten the hex bolts in several alternat
-
ing sequences.
Figure 10. Chuck mounting components.
Securely clamp your workpiece
and remove the chuck key!
Thrown objects from a lathe/
mill can cause serious injury
or death to the operator and to
bystanders many feet away.
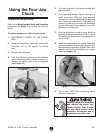
The three-jaw scroll chuck has hardened steel
jaws that self-center the workpiece within 0.002"-
0.003". An extra set of jaws is included for machin
-
ing larger workpieces.
The four-jaw chuck also has hardened steel jaws
but are adjusted independently to hold an off-
center workpiece. Each jaw can be removed from
the chuck body and reversed for special clamping
applications.
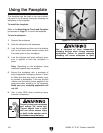
The cast-iron faceplate has slots for T-bolts that
hold clamping fixtures. This face plate and after
-
market clamping hardware will hold non-cylindri
-
cal parts such as castings for many types of turn
-
ing operations.
Both chucks and the faceplate are removed and
installed the same way.
To remove and install the chuck or face plate:
1. DISCONNECT POWER TO THE LATHE/
MILL!
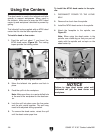
2. Lay a chuck cradle or protective layer of
plywood over the bedways to prevent your
fingers from being pinched and to protect the
precision-ground surfaces (see
Figure 9).
Figure 9. Simple chuck cradle made of scrap
lumber.
Bed