


-14- G1013 Combination Sander
SECTION 5: Adjustments
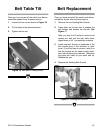
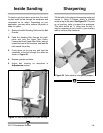
Figure 16. Adjusting rear axle.
4. Move hands away from 8'' disc.
5. Plug sander into power and turn machine on
and off quickly. Inspect tracking.
6. Repeat steps 1-5 until the belt is centered on
the rollers.
If the belt tracks properly on the two front rollers,
but not on the rear roller, the rear roller must be
adjusted. The roller shaft axle is slightly bent. By
turning the axle, belt tracking will be affected.
1. Turn off the sander and disconnect it from its
power source.
2. Remove rear belt guard.
3. Using a 10mm wrench, turn the rear axle nut.
See Figure 16.
4. Keep rotating by hand until the sanding belt
rides in the center of the roller.
5. Replace the rear belt guard.
The idler and drive rollers are slightly crowned to
keep the belt centered on the rollers. This will not
correct improper tracking. Tracking must be peri-
odically adjusted (particularly after belt replace-
ment) to keep the belt properly aligned to the
rollers and the platen. To adjust tracking:
1. Unplug the machine!
2. Remove the Sanding Belt Table and
Sanding Belt Guards.
2. Turn the 8'' disc by hand to observe lateral
belt drift. DO NOT turn the sander on to
inspect for belt drift.
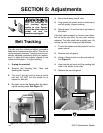
3. By sight, center the Sanding Belt by adjust-
ing the tracking knob. See Figure 15.
Figure 15. Location of tracking adjustments.
Tracking Knob
Rear Axle Nut
Lock Knob
Belt Tracking
With the exception of
belt tracking, adjust-
ments to your Sander
should be made with the
power off and the
machine unplugged!