


- 7-
- 7 -
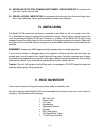
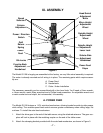
IX. ASSEMBLY
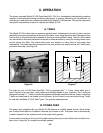
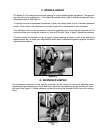
Figure 2
The Model G1126 is largely pre-assembled at the factory, so very little actual assembly is required.
The motor is already mounted and all wiring is in place. The remaining parts which require assem-
bly are:
A. Power Feed
B. Handwheels
C. Cutter / Arbor Installation
The necessary assembly can be accomplished with a few hand tools. You’ll need a 12mm wrench,
a 14mm wrench, metric Allen wrenches and a Phillips head screwdriver. An adjustable wrench and
a metric socket set are helpful, but not essential, for assembly.
Spindle Height
Adjustment
Lever Lock
Front-to-Back
Adjustment
Handwheel
Power
Feed
Column
Adjustment
Quill
Return
Spring
Side-to-Side
Adjustment
Handwheel
Speed
Selectors
Power / Direction
Switch
Spindle Height
Adjustment
Wheel
Micro Height
Adjustment
Wheel
Head Swivel
Adjustment
Bolts
Power Feed
Stops
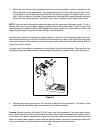
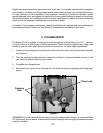
A. POWER FEED
The Model G1126 features a 110V auto-feed mechanism, allowing hands-free side-to-side passes
while milling. The variable-speed feed control ensures greater consistency when milling large, flat
surfaces. To install the auto-feed mechanism:
1. Attach the drive gear to the end of the table screw, using the attached setscrew. The gear cou-
plers will lock in place with the matching coupler on the end of the table screw.
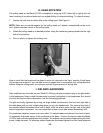
2. Attach the clamping bracket provided with the auto-feed mechanism, as shown in Figure 3.
Gib Locks