


-12- G4002/3 Gear Head Lathes
4-Jaw Chuck
The 4-jaw chuck supplied with the G4002/3 is not
mounted to the back plate. Assembly of the back
plate components is also required.
1. Make note of the reference lines on each
of the 3-jaw chuck studs. Thread each of
the 4-jaw chuck cam lock studs into the 4-
jaw chuck back plate to the exact same
depth as the 3-jaw studs. Screw in the
locking cap screws.
2. Mount the back plate on the spindle.
3. Accurately measure the inside of the back
relief bore on the 4-jaw chuck. This
dimension is critical, ± .001''.
4. Face the back plate to true it. Make pass-
es across the face until its entire surface
has been cut.
5. Turn a shoulder into the face
1
⁄8'' deep and
.001" to .002'' larger than the back relief
bore diameter. Chamfer the corner a
small amount.
6. Set the chuck on the back plate aligning
the shoulder with the relief bore. Use a
transfer punch to mark the back plate. If a
transfer punch is not available, a drill bit of
the same size as the mounting holes in
the chuck can be used. Lightly tap on the
bit, rotate it 90° and tap it again.
7. Remove the chuck from the back plate
and center punch the marks. Drill and tap
the holes for
3
⁄8''-16.
8. Set the chuck on the back plate. Line up
the mounting holes and thread in the cap
screws supplied. Remember that this is a
.001" to .002" press fit. Snug up the first
cap screw then alternate to the cap screw
across the chuck. Alternating the tighten-
ing process insures the chuck will go on
straight. This step should be repeated
until the back plate fits snugly against the
chuck. If the chuck fits loosely on the back
plate, or is crooked on the shoulder, it will
be necessary to face and shoulder the
back plate again.
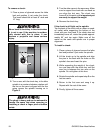
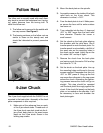
The follow rest is normally used with small diam-
eter stock to prevent the workpiece from “spring-
ing” under pressure from the turning tool. To
install the follow rest:
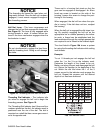
1. The follow rest is secured to the saddle with
two cap screws. See Figure 6.
2. The bearing surfaces on the follow rest are
similar to those on the steady rest, and
should be lubricated to prevent premature
wear.
Figure 6. Follow rest secured to saddle.
Follow Rest