


-12-
H7583 Tenoning Jig
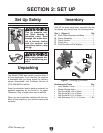
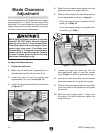
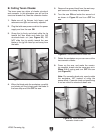
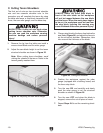
Figure 10. Blade clearance adjustment.
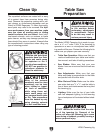
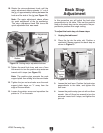
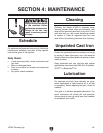
Figure 11. Blade parallelism.
Jam Nut
and Positive
Stop
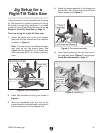
In this procedure you will adjust the work support
plate parallel and
1
⁄8" away from the edge of the
saw blade. Then set the positive stop so the work
support plate can be quickly returned to this posi
-
tion after cutting various thicknesses.
Blade Clearance
Adjustment
MAKE SURE the blade clearance is adjusted
correctly! DO NOT adjust the work support
plate any closer than
1
⁄8" from the saw blade.
If the blade contacts the work support plate,
severe injury may occur. If the blade must
be closer than
1
⁄8" for special circumstances,
fasten a block of wood through the holes in
the work support plate to prevent the saw
blade from contacting the jig.
Large
Lock
Lever
Small
Lock
Lever
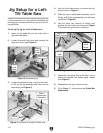
5. Slide the work support plate against the saw
blade and tighten the large lock lever.
6. Observe the contact of the saw blade and the
work support plate as shown in
Figure 11.
—If the work support plate is parallel with the
blade, go to
Step 10.
—If the work support plate is not parallel with
the blade, go to
Step 7.
To adjust the blade clearance:
1. Unplug the table saw!
2. Make sure the saw blade is perpendicular to
the table and parallel with the miter slots.
3. Loosen the jam nut and the positive stop
approximately 3-4 turns (see
Figure 10).
4. Loosen the large and small lock levers shown
in Figure 10.
7. Loosen the large lock lever and turn the
micro-adjustment knob to align the access
holes (
Figure 11) with the guide bar screws.
8. Insert a 4mm hex wrench through the access
holes and loosen the two guide bar screws.
9. Position the work support plate so it is parallel
to the saw blade and retighten the two guide
bar screws.
10. Move the work support plate
1
⁄8" away from
the edge of the saw blade and tighten the
large lock lever.
Access
Holes
Micro-Adjustment
Knob