


H7583 Tenoning Jig
-13-
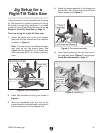
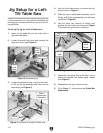
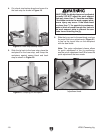
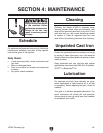
10. Rotate the micro-adjustment knob until the
major adjustment sleeve extends 1
1
⁄2" out of
the jig, or approximately halfway between the
knob and the side of the jig (see
Figure 12).
Note: The major adjustment sleeve allows
for quick adjustment of the jig positioning.
The micro adjustment knob fine tunes the
quick adjustment that was made.
Figure 12. Setting major adjustment sleeve.
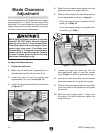
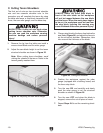
11. Tighten the small lock lever and use a 3mm
hex wrench to turn the positive stop setscrew
inward until it stops (see
Figure 10).
Note: The positive stop prevents the work
support plate from sliding into the saw blade.
12. Tighten the jam nut and make sure the work
support plate stops an
1
⁄8" away from the
edge of the saw blade.
13. Loosen the pointer screw and reposition the
pointer to “0” on the scale.
1
1
⁄2"
Micro-Adjustment
Knob
Major Adjustment
Sleeve
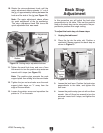
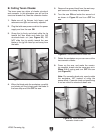
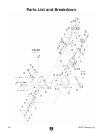
Figure 13. Machinist’s square location.
Jam
Nut and
Positive
Stop
In this procedure you will adjust the back stop
perpendicular to the table. Then set the positive
stop so the back stop can be returned to the per-
pendicular position after angle cutting.
To adjust the back stop, do these steps:
1. Unplug the table saw!
2. Place the jig into the miter slot. Position a
machinist’s square against the back stop as
shown in
Figure 13.
Back Stop
Adjustment
Lock
Lever
Back
Stop
3. Loosen the lock lever. Position the back stop
perpendicular to the table, and tighten the
lock lever.
4. Loosen the positive stop jam nut with an 8mm
wrench. Use a 2.5mm hex wrench to turn the
setscrew inward until it stops, and tighten the
jam nut.