


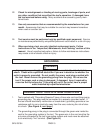
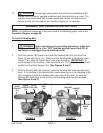
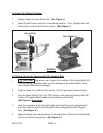
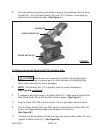
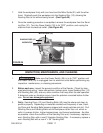

6. Once the sanding procedure is completed, remove the workpiece from the Sand-
ing Belt (45). Turn the Power Switch (30) to its “OFF” position, and unplug the
machine from its electrical outlet. (See Figure K.)
WORKPIECE
POWER SWITCH (30)
WORK
SUPPORT
(33)
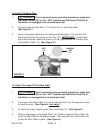
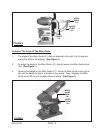
To Perform Vertical Sanding With The Sanding Belt:
1. CAUTION! Before each use, inspect the condition of the Sanding Belt (45).
Look for tearing, excessive wear, or other damage to the Sanding Belt. Never
use a Sanding Belt that is damaged.
FIGURE K
2. Slightly loosen the Lock Screw (20). (See Figure J.)
3. Raise the Belt Frame vertically to the desired position. Then, retighten the Lock
Screw (20) to lock the Belt Frame in place. (See Figure J.)
4. Plug the Power Cord (29) into the nearest 110 volt, grounded, electrical outlet.
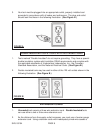
5. Turn the Power Switch (30) to its “ON” position, and allow the Sanding Belt (45)
to spin at full speed before feeding the workpiece into the Belt.
(See Figure L, next page.)
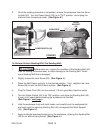
6. Hold the workpiece firmly with both hands, and carefully set the workpiece flat
and level upon the spinning Sanding Belt (45) and against the Work Support
(33). (See Figure L.)
7. Apply moderate downward pressure on the workpiece, allowing the Sanding Belt
(45) to cut without being forced. (See Figure L.)
SKU 05154 PAGE 15