


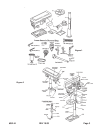

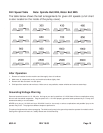
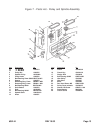


3. Consult the chart inside the pulley cover (or Figure 5) and position the belts on the pulleys according to the spindle/drill
speed required
4. When the belts have been correctly positioned, tighten them by turning the Belt Tension Lever counter clockwise until the
belt deflects by approximately 1/2’ at its center when using reasonable thumb pressure. Lock the lever in this position with
the two Locking Knobs.
Operation
1. Insert the drill into the jaws of the chuck approximately 1”, ensuring that the jaws do not touch the flutes of the drill. Before
tightening the chuck, ensure that the drill is centered within the jaws. Tighten.
2. Make sure the table height and position is set so that the drill travel range is sufficient for the material to be drilled.
3. Make sure the work is securely clamped. That is, held in a drill vise, or bolted to the table.
Never hold the material with your
bare hands while drilling. Severe personal injury may be caused if the material is flung out of the operator’s hand.
4. IF THE MATERIAL IS IRREGULARLY SHAPED and cannot be laid flat on the table, it should be securely blocked and
clamped. Any tilting, twisting or shifting will result not only in a roughly drilled hole but also increases the chances of
damage to the drill.
5. FOR FLAT WORK, lay the piece on a wooden base and clamp it down firmly against the table to prevent it from turning.
6. FOR SMALL MATERIALS that cannot be clamped to the table, use a drill press vise. Make sure the vise is clamped or bolted
to the table.
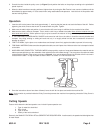
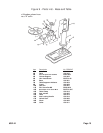
7. WHEN DRILLING COMPLETELY THROUGH WOOD, always position a piece of scrap wood between the material and the
table to prevent splintering on the underside of the material as the drill breaks through. The scrap piece of wood must make
contact with the left side of the column as shown in Figure 6. Also, set the depth of the drill so that the drill will not come in
contact with the table - or align the table so that the hole in its center is in line with the drill bit.
Figure 6
8. Once the instructions above have been followed, lower the drill bit into place and switch the machine ON .
Note: A micro switch is provided inside the Pulley Cover that prevents the machine from operating unless the Pulley Cover is
firmly closed.
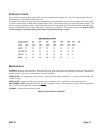
Cutting Speeds
Factors which determine the best speed to use in the drill press operation are:
1. Type of material to be drilled
2. Size of hole
3. Type of drill bit
4. Quality of the hole/cut desired.
Generally, the SMALLER THE DRILL BIT the GREATER THE REQUIRED RPM. In soft material, the speed should be higher than
for hard metals.
#38144 REV 10/03 Page 9