


Page 11SKU 44914
PLEASE READ THE FOLLOWING CAREFULLY
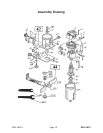
THE MANUFACTURER AND/OR DISTRIBUTOR HAS PROVIDED THE PARTS DIAGRAM IN THIS
MANUAL AS A REFERENCE TOOL ONLY. NEITHER THE MANUFACTURER NOR DISTRIBUTOR
MAKES ANY REPRESENTATION OR WARRANTY OF ANY KIND TO THE BUYER THAT HE OR
SHE IS QUALIFIED TO MAKE ANY REPAIRS TO THE PRODUCT OR THAT HE OR SHE IS QUALI-
FIED TO REPLACE ANY PARTS OF THE PRODUCT. IN FACT, THE MANUFACTURER AND/OR
DISTRIBUTOR EXPRESSLY STATES THAT ALL REPAIRS AND PARTS REPLACEMENTS SHOULD
BE UNDERTAKEN BY CERTIFIED AND LICENSED TECHNICIANS AND NOT BY THE BUYER.
THE BUYER ASSUMES ALL RISK AND LIABILITY ARISING OUT OF HIS OR HER REPAIRS TO
THE ORIGINAL PRODUCT OR REPLACEMENT PARTS THERETO, OR ARISING OUT OF HIS OR
HER INSTALLATION OF REPLACEMENT PARTS THERETO.
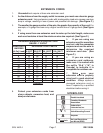
5. Finally, center the cutting bit over the edge to be trimmed by loosening Thumbscrew
(430) and sliding the Guide Block (427) into position. Tighten Thumbscrew (430).
With Thumbscrew (430) partially loosened, fine adjustments can be made with
Adjusting Set Screw (424). When the adjustments are finalized, tighten Thumbscrew
(430).
6. Make a test cut on a piece of scrap material. Make any necessary adjustments before
cutting the final workpiece.
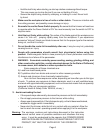
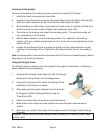
Best Trimming Routing Direction
The Router Bit rotates clockwise. You must adjust for this while cutting.
1. For most materials it is best to move the Router from left to right as you face the
workpiece.
2. When cutting outside edges, move the router counterclockwise. When cutting inside
edges, move the router clockwise.
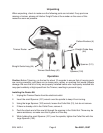
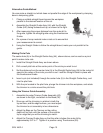
Maintenance
Caution: Avoid injuries. Before performing any maintenance on this tool, unplug the
power cord from the electrical outlet, and wait for the router and/or bit to cool.
1. Wipe the Tool with a clean cloth after every use.
2. Periodically blow out the Motor vent holes with compressed air to prevent the buildup
of dust and particles.
3. Periodically wipe the Collet, Collet Cones, and Cutting Bits with a light oil to prevent
rust.
4. Over time, if the performance of the tool diminishes, or it stops working completely, it
may be necessary to replace the Carbon Brushes (4) by removing the Brush Holder
Cap (5).This procedure must be completed by a qualified technician.