


Page 15For technical questions, please call 1-800-444-3353.SKU 93212
setting, and letting it run for several
minutes at each setting before increasing
to the next level. Continue until you’ve
run the Lathe all the way up to the
highest setting.
Turn the Power Switch OFF and wait for 11.
the Lathe to come to a complete stop.
Repeat the process with the H/L Gear 12.
Shift Lever at the High setting. Then
repeat at both the Low, then High setting
with the Forward/OFF/Reverse Switch in
the Reverse position.
WARNING: THE MINI LATHE MUST BE
COMPLETELY STOPPED BEFORE
CHANGING THE FORWARD/OFF/
REVERSE SWITCH (181), THE FEED
DIRECTION SELECTOR (35), OR THE
GEAR SHIFT LEVER (33).
Turn the Power Switch off, the Speed 13.
Control Knob to 0 and unplug the Lathe.
Check the Compound Rest Crank (86b) 14.
and the Cross Slide Crank (86a) to see
that the Compound Rest (105/108) and
Cross Slide work properly. If they are
too tight or too loose, adjust the Gibs
(94/107) located at both crank sides (See
Gib Adjustments in the Maintenance
Section of this manual).
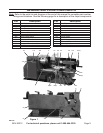
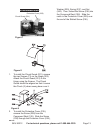
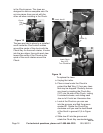
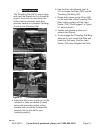
Replacement of Chuck
Figure 13
Nut (6)
Spindle (3)
Chuck (2)
1. When replacing the Chuck, place a cloth
or a piece of wood on the bedway at the
bottom of the chuck. This step will help
avoid damage to the bedway caused by
accidentally dropping the chuck.
To replace the chuck, loosen the 3 Nuts 2.
(6) as shown in Figure 13, remove the
old Chuck and replace with a new chuck.
Replace and tighten the Nuts.
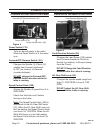
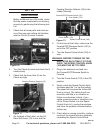
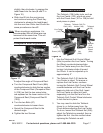
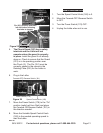
Replacement of Jaws
Figure 14
Internal Jaw Set (168)External Jaw Set (166)
Insert this
end rst
Number
The Lathe comes with two sets of
Jaws: an External Jaw Set (166) and
an Internal Jaw Set (168). Each piece
is numbered and ts into the Chuck
grooves with the corresponding number
REV 10b