


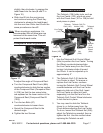


Page 17For technical questions, please call 1-800-444-3353.SKU 93212
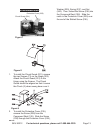
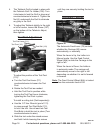
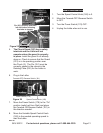
slightly, then clockwise, to engage the
lead thread into the Jaw (B and C in
Figure 16).
Slide Jaw #2 into the next groove e.
and continue turning the Chuck Key
clockwise to advance the lead thread
into the next Jaw. Slide Jaw #3 with the
same procedure as Jaw #2.
Note: When mounting a workpiece, it is
recommended that all three jaws are
loosened at the same time. This will
protect the threads inside.
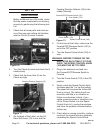
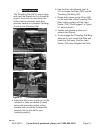
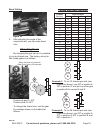
Compound Rest Adjustment
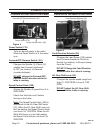
Figure 17
Compound Rest Crank (86b)
Compound Rest A (108)
Compound Rest B (105)
Bolt Holes
& Bolts (67)
To adjust the angle of Compound Rest:
Turn the Compound Rest Crank (86b) a.
counterclockwise to slide the top section
of the Compound Rest (Compound Rest
A (108)) so that the two screw holes
are exposed on the lower section of the
Compound Rest (Compound Rest B
(105)).
Turn the two Bolts (67) b.
counterclockwise to loosen them.
Swivel the Compound Rest to the c.
desired angle.
Tighten the two Screws.d.
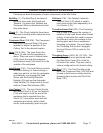
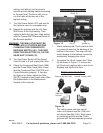
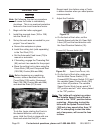
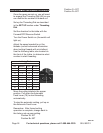
Tailstock Adjustments
The Tailstock (138) holds tools, such as
the Live Center (143), which are used
with the Chuck Jaws (167 or 168) to hold
work pieces in place.
Tailstock
Nut
(268)
Tailstock
(138)
Tailstock Quill Fix
Holder (146)
Live Center
(143)
Tailstock
Quill (142)
Tailstock
Quill
Control
Wheel
(84a)
Figure 18
Nut (6)
Screw (197)
Underside
of
Tailstock
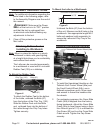
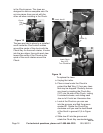
1. Use the Tailstock Quill Control Wheel
(84a) to position the Live Center. Turning
the Wheel counterclockwise slides
the Live Center away from the Chuck,
turning it clockwise slides it toward
the Chuck. It can be adjusted up to
approximately 2”.
The Tailstock Quill (142) holds the 2.
Live Center in place. To remove or
replace the Live Center, continue
turning the Tailstock Quill Control Wheel
counterclockwise until the Live Center
begins to slide out of the Quill. Insert
the Live Center or other tool (sold
separately) into the Quill and turn the
Tailstock Quill Control Wheel clockwise
to lock the tool in place.
You may need to slide the Tailstock 3.
closer to, or further away from, the
Chuck before adjusting the Live Center.
To do so, loosen the Tailstock Nut (268),
adjust the Tailstock as needed, then re-
tighten the Nut. Use this method when
replacing the Tailstock as well.
REV 10b