


SKU 93364 For technical questions, please call 1-800-444-3353 PAGE 7
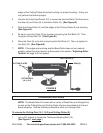
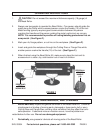
2. Use the 5mm (26) Hex Key Wrench to remove the eight Hex Bolts (18) securing
the Cutting Plates (9) to the Cutting Dies (10-1, 10-2). (See Figure C.)
3. Remove the Cutting Plates (9). (See Figure C.)
4. Use a 14mm wrench to remove the two End Bolts (14) securing the Cutting Dies
(10-1, 10-2) to the Active Roller (3) and Positive Roller (4). Then, remove the
Washers (13). (See Figure C.)
5. Use the 4mm Hex Key Wrench (27) to loosen the Hex Bolts (16) that lock the
Cutting Dies (10-1, 10-2) onto the Active Roller (3) and Positive Roller (4).
(See Figure C.)
6. Remove the Cutting Dies (10-1, 10-2). (See Figure C.)
CUTTING DIES
(10-1, 10-2)
THICKNESS ADJUSTING BOLT (15)
CUTTING
PLATES
(9)
HEX
BOLTS
(18)
WASHERS
(13)
ACTIVE ROLLER (3)
POSITIVE ROLLER (4)
FIGURE C
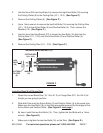
Installing Bead And Flange Dies:
1. Select the correct Bead Dies (19-1 thru 21-2) or Flange Dies (22-1 thru 24-2) for
the job you are going to perform.
2. Slide both Dies onto the Active Roller (3) and Positive Roller (4) at the same time.
Make sure the Hex Bolts (16) on the Dies are positioned over the flat edges of the
Active Roller and Positive Roller. (See Figure D, next page.)
3. By hand, install the two End Bolts (14). Then, tighten the End Bolts with a 14mm
wrench. (See Figure D.)
4. Make sure to tighten the two Hex Bolts (16) on the Dies. (See Figure D.)