


— 11 —
English
ASSEMBLY AND ADJUSTMENTS
ESTIMATED ASSEMBLY TIMES 20~40 MINUTES
ASSEMBLY INSTRUCTIONS
WARNING
For your own safety, never connect plug to power source
outlet until all assembly and adjustment steps are
completed, and you have read and understood the safety
and operating instructions.
TOOLS NEEDED
Socket wrench with
23 mm. socket
Framing square
Combination wrenche
Slotted screwdriver
Combination square
8" & 10" Ajustable wrenches
WARNING
The Drill Press is very heavy and MUST be assembled with
the help of 2 PEOPLE OR MORE, to safely assembly it.
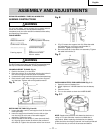
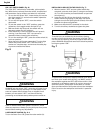
COLUMN SUPPORT TO BASE (Fig. A)
1. Position the base (1) on the floor.
2. Place the column (2) on the base, aligning the holes in
the column support with the holes in the base.
3. Locate the four long hex bolts (3) from the loose parts bag.
4. Place a bolt in each hole through the column support
and the base. Tighten with an adjustable wrench.
Fig. A
1
2
3
3
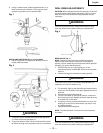
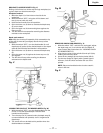
INSTALLING THE TABLE (Fig. B and C)
1. Locate the table crank (1) and support lock (2) from the
loose parts bag.
2. Insert the support lock handle from the left to right
into the hole (3) at the rear of the table support
assembly. Tighten by hand.
3. Install the table crank handle (1) onto the small shaft
(4), aligning the set screw (5) with the flat surface of
the shaft (4). Tighten the set screw with a hex wrench.
Fig. B
1
5
4
3
2
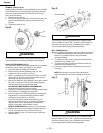
4. (Fig. C) Loosen the support lock (2). Raise the table
arm assembly by turning the crank handle (1)
clockwise. Tighten the support lock.
5. Place the table (6) in the table arm assembly. Tighten
the table lock handle (7).
Fig. C
6
7
1
2
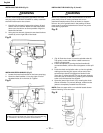
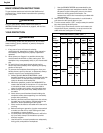
INSTALLING BATTERY FOR LASER GUIDE (Fig. C-1)
1. Open the cover of battery box.
2. Install 2 pieces of 1.5V 3A batteries into the battery
box.
3. Close the cover.
4. Turn on the switch to check the LASER GUIDE.
Fig. C-1
NOTE: Replace the batteries with batteries that have a
rating of 1.5 volts (Number 4 series and AAA size or
equivalent). When replacing the batteries, the battery
guide should be thoroughly cleaned. Use a soft paintbrush
or similar device, to remove all sawdust and debris.