


— 21 —
English
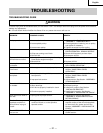
TROUBLESHOOTING GUIDE
WARNING
To avoid injury from an accidental start, turn the switch “OFF” and always remove the plug from the power source before
making any adjustment.
ⅷ Consult Hitachi Authorized Service Center if for any reason the motor will not run.
TROUBLESHOOTING
PROBLEM
Noisy operation
Drill bit burns
Run out of drill bit point -
drilled hole not round.
Wood splinters on
underside.
Workpiece torn loose
from hand.
Drill bit binds in
workpiece.
Excessive drill bit runout
or wobble.
Quill returns too slow or
too fast.
Chuck will not stay
attached to spindle. It
falls off when trying to
install.
The LASER GUIDE will
not turn on.
POSSIBLE CAUSES
1. Incorrect belt tension.
2. Loose spindle pulley.
3. Loose motor pulley.
1. Incorrect speed.
2. Chips not coming out of hole.
3. Dull drill bit.
1. Hand grain in wood or lengths of cutting
flutes and/or angles not equal.
2. Bent drill bit.
1. No backup material under workpiece.
1. Not supported or clamped properly.
1. Workpiece pinching drill bit, or excessive
feed presure.
2. Improper belt tension.
1. Bent drill bit.
2. Worn bearings.
3. Drill bit not properly installed in chuck.
4. Chuck not properly installed.
1. Spring has improper tension.
1. Dirt, grease, or oil on the tapered inside
surface of chuck or on the spindle’s
tapered surface.
1. The batteries are broken.
REMEDY
1. Adjust tension. See Section
“ASSEMBLY - TENSIONING BELT”
2. Check tightness of retaining nut on pulley,
and tighten if necessary.
3. Tighten set screw in motor pulley.
1. Change speed. See Section “BASIC DRILL
PRESS OPERATION - SPINDLE SPEEDS”
2. Retract drill frequently to clear chips.
3. Resharpen drill bit.
1. Resharpen drill bit correctly.
2. Replace drill bit.
1. Use backup material. See Section “BASIC
DRILL PRESS OPERATION”.
1. Support workpiece or clamp it. See
Section “BASIC DRILL PRESS
OPERATION”.
1. Support workpiece or clamp it. See
Section “BASIC DRILL PRESS
OPERATION”.
2. Adjust tension. See Section “ASSEMBLY -
TENSIONING BELT”.
1. Replace drill bit.
2. Replace bearings.
3. Install drill properly. See Section
“INSTALLING DRILL BIT”.
4. Install chuck properly. See Section
“ASSEMBLY - INSTALLING THE CHUCK”.
1. Adjust spring tension. See Section
“ASSEMBLY - ADJUSTMENTS -QUILL
RETURN SPRING”.
1. Using a household detergent, clean the
tapered surface of the chuck and spindle
to remove all dirt, grease and oil. See
Section “ASSEMBLY - INSTALLING THE
CHUCK”.
1. See INSTALLING BATTERY FOR LASER
GUIDE section.