


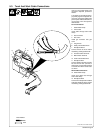
OM-2210 Page 22
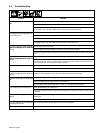
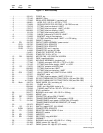
5-4. Troubleshooting
Trouble Remedy
No pilot arc; difficulty in establishing an
arc.
Clean or replace worn consumables as necessary (see torch Owner’s Manual).
arc.
Check for damaged torch or torch cable (see torch Owner’s Manual).
Have Factory Authorized Service Agent check control relay CR6, power control board PC1, safety con-
trol board PC2, gas valve GS1, rectifier SR1, and check gas/air system for leaks.
No cutting output; Power light off
;
Trouble lights off; Ready light off; fan mo-
Place Power switch in On position.
Trouble lights off; Ready light off; fan mo-
tor FM does not run.
Place line disconnect device in On position (see Section 3-8).
Check line fuse(s) and replace if needed or reset circuit breakers (see Section 3-8).
Have Factory Authorized Service Agent check power switch S1, input voltage selector switch S2, input
resistor R2, control relay CR6, safety control board PC2, and transformer T1.
No cutting output; Power light on; Read
y
light on; Trouble lights off; fan motor FM
Be sure work clamp is connected.
light on; Trouble lights off; fan motor FM
running.
Clean or replace worn consumables as necessary (see torch Owner’s Manual).
Have Factory Authorized Service Agent check contactor W, control relay CR3, and safety control board
PC2.
No cutting output; Power light on; Read
y
light off; Trouble lights off; fan motor FM
Reset Power switch.
light off; Trouble lights off; fan motor FM
running.
Have Factory Authorized Service Agent check contactor CR7, control relay CR6, safety control board
PC2, input resistor R2, power control board PC1. Check for proper torch lead connections. Check opera-
tion of gas valve GS1, and check gas/air system for leaks.
No control of output. Check position of input voltage selector switch S2 (see Section 3-8).
Have Factory Authorized Service Agent check power control board PC1, and safety control board PC2.
No gas/air flow; Power light on; Ready
light on; Trouble lights off; fan motor FM
running.
Have Factory Authorized Service Agent check for proper torch connections, and check power control
board PC1. Check operation of gas valve GS1, and check gas/air system for leaks.
Pressure Trouble light On; Ready ligh
t
off.
Check for correct gas/air pressure adjustment (see Section 4-1).
off.
Check for sufficient gas/air supply pressure (see Section 3-7).
Check for dirty air filter/regulator and clean, if needed (see manufacturer’s instructions).
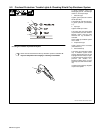
Cup Trouble light On; Ready light off. Check torch shield cup (see Section 5-2).
Have Factory Authorized Service Agent check for proper torch connections, and check safety control
board PC2.
Temperature Trouble light On; Ready
light off.
Thermostat TP1 open (overheating). Allow fan to run; the thermostat closes when the unit has cooled (see
Section 3-5).
Have Factory Authorized Service Agent check safety control board PC2 and transformer T1.
Fan motor FM does not run; Power light
and Ready light both On.
Have Factory Authorized Service Agent check fan motor connections.
Trouble lights not working. Have Factory Authorized Service Agent check safety control board PC2.