


13
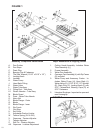
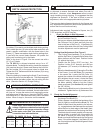
1. Raise the Blade Guard (M) to fully up and tighten
the wing nut on the side to hold it in the raised
position.
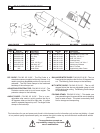
3. Remove the Arbor Nut (O) and the Outer Blade
Flange (P).
4. Check the Blade (Q) for Counter Clockwise
rotation (CCW) and install on the spindle shaft
against the Inner Blade Flange (R).
Rotation direction is indicated by an arrow on
one side of the blade. Make sure the blade
contact surfaces are clean.
5. Install the Outer Flange (P) with the large di-
ameter against the Blade (Q). Hand tighten
the Arbor Nut (O) with the 15/16” Wrench (E)
provided. Do not overtighten; hand tight is suf-
cient
6. Lower the Blade Guard (M) and retighten the
wing nut to securely hold the guard down in
place.
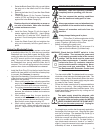
Using the Bladeshaft Lock
An easy-to-use Bladeshaft Lock system can be used
to loosen the Arbor Nut (O). With one hand, push the
Bladeshaft lock Lever back toward the Motor while
rotating the Arbor Nut Counter Clockwise (CCW) with
the 15/16” wrench until the Lock engages the Blade-
shaft. The Lock will then stay engaged, preventing
the Bladeshaft from turning while the Arbor Nut is
removed. The Lock will spring-return to the unlocked
position when Lever and Bladeshaft are released.
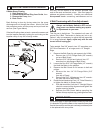
• Install the Drain Plug (C) into the front end of the pan
and ll with clean water until inlet lter of water pump
is covered. See Features for capacity.
• Adjust the Pan Assembly (2) to accommodate the size
of the tile to be cut and to obtain the most comfortable
position for the operator.
1. When cutting smaller tiles, adjust the pan all the
way to the rear. The operator has full view and
control of the work with minimum stretching.
2. For cutting intermediate sized tiles, such as 10”
or 12” tile, the pan can be placed somewhere
between the maximum forward and maximum
rear positions.
3. When cutting larger tiles, the pan should be
moved to the maximum forward position, thus
giving the operator the best and most comfort-
able position, even diagonal-cutting 22”.
4. When cutting smaller tile, adjust cart stop to
limit cart travel. When making extra long cuts
up to 31”, adjust cart stop to allow for extended
travel.
WARNING: Read the Operating Procedure
completely before operating your tile saw.
Take into account the working conditions
from the health and safety point of view.
Always pay extreme care and attention to the
preparation of the machine before starting.
Remove all wrenches and tools from the
machine.
Always keeps blade guard in place.
• Fill the Pan (2) with enough water to fully
submerge the water pump screen. It takes approxi-
mately 12 gallons (46 liters) to ll the Pan.
• Before connecting the power cord:
* Check the Blade Shaft Nut (O) to be sure it is
tight and that the Blade (Q) rotates freely.
WARNING: Check that the ON/OFF switch is in the
OFF position. Then connect the power cord
to a properly grounded outlet of the correct
voltage. See the decal near the power cord
for power requirements. If needed, use the
correct size three (3) conductor extension
cord to avoid excessive voltage drop. Never
use lamp cord type extensions. Refer to
the Recommended Extension Cords chart
below.
• Turn the switch to ON. The blade should turn counter-
clockwise, when looking at the blade guard side. The
water pump will start automatically when the motor
starts. Adjustment of the water supply may be made
by means of the Control Valve(K).
• Follow the blade manufacturer’s recommendations
for dry or wet cutting. Wet cutting blades can be
damaged or destroyed without sufcient water. Only
blades specically designed for dry cutting can be
used without coolant.
The water supply should be adequate, with
water owing on both sides of the blade. Keep
the water clean and make certain the WATER
LEVER IS ALWAYS ABOVE THE PUMP INLET.
Do not run the water pump dry!! Unplug for
dry cutting.
• For straight cuts, position the tile squarely against the
back edge of the conveyor cart. Keep the cart clean
and free of cuttings. The standard Rip Guide (S) is
supplied for setting cutting lengths.
• Move the conveyor cart slowly and carefully until the
blade is in contact with the tile. For best cutting, a
new blade needs a chance to “break-in” or “wear-in”
slightly. It may take several cuts to open (expose the
diamonds) of a new or closed blade.
4 OPERATING PROCEDURE