


15
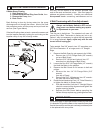
9 PROFILE WHEEL SET-UP AND USE
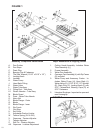
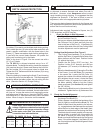
See Figure 1
The TS 250 XL is designed for use with a Husqvarna® 6”
Prole Wheel, such as P/N 542 62 10-81* (3/8” Radius)
or 542 62 10-82* (1/2” Radius).
• Raise the blade guard. Remove the spindle nut
and outer ange. Remove the tile saw blade if one
has been installed. (Refer to Section 5, Adjustable
Lockbar, if needed)
• Install the prole wheel onto the spindle shaft up
against the inner ange with the working surface to
the outside.
• Secure into place by reversing the outer ange and
tightening the spindle nut. Lower the Blade Guard
(J) back down over the prole wheel.
• Locate the material for proling:
1. Set the edge of the part to be shaped parallel to
the wheel.
2. Locate the material under the wheel. Pull the
Conveyor Cart (4) with the material from under
the wheel to set proper cutting height.
3. Loosen the Locking Knob (F) and lower the
Cutting Head (1) so that the wheel just slightly
makes contact with the material.
4. Secure the Cutting Head (1) into position with
the Locking Knob (F) for cutting.
Parallel Alignment for Sraight Cuts
The Rails determine the path the tile on the
Conveyor Cart (4) travels. For a straight cut,
the Cart must then travel ‘Parallel’ to the plane
(or side surface) of the Blade. The path of the
Conveyor Cart (4) must then be modied by
adjusting the Rails to agin be Parallel to the side
of the Blade. Slotted mounting holes in both ends
of the Water Pan (2) are provided to allow for
this adjustment.
Tip: Align only one Rail rst; usually the Inner
Rail. After one Rail is aligned the other is easily
aligned using the Cart (4) as a guide. If moving
the one end of the Rail is not enough to provide
complete alignment, the other end can be moved
in the opposite direction to provide additional
Rail movement.
* Slightly loosen all 1/4”-20 fasteners (7/16”
wrenches) locating the two Rails so that both
rails are free to move. Move one end of the
Inner Rail until the square remains ush with
the Blade while the cart is moved to and fro as
described above in Check Parallel Alignment.
Tighten the fasteners of this rail and recheck the
alignment.
* Once alignment of one Rail has been made set
the second Rail parallel to the rst. Traverse the
Cart (4) back and forth along the rails and use
it as a guide to locate the second rail parallel to
the rst. Tighten the remaining 1/4”-20 fasteners
5. Note: Proling usually takes several light passes
to produce the best results. Set lower each time
until the desire depth has been reached.
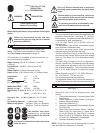
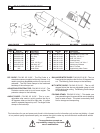
10 PLUNGE CUTTING
See Figures 1 & 2
Spring Force Adjustment:
Spring force can be adjusted by rotating Spring Tensioner
(Y). Loosen the 3/8”-16 Bolt (X) and rotate Spring Tensioner
(Y) to increase or decrease Spring Force. Tighten Bolt to
secure Tensioner to Pivot Shaft. It may be necessary to
slightly loosen the Bearing Caps (D) for proper and smooth
operation. By loosening Knob (F), Pivot Head can be
raised or lowered with minimal effort, depending on Spring
Force adjustment.
Limiting Cutting Head Movement:
An adjustable Head Position Limiter (V) is located on the
underside of the Head platform and is used to locate the
Blade in the center slot of the Cart and, along with the
Lockbar, as a raise and lower Position limiter for the Cutting
Head. See Cutting Head Adjustment; section 8.
Before performing any maintenance, ALWAYS
place the machine on a level surface with
the motor OFF and disconnect the electrical
current. Let the machine cool down!!
Your Husqvarna® tile saw is a ruggedly constructed
11 MAINTENANCE PROCEDURES
machine, engineered to give long, satisfactory performance.
Simple daily maintenance and care will add to the life and
productivity of your saw. After each day’s use: CLEAN
THE MACHINE!!
* Turn off and unplug the saw before performing
any maintenance.
* Keep the cart top clean and free for cuttings. To
clean it, ush the top surface and grooves with
water.
* Drain, clean and rell the pan frequently. Flush
the coolant system with plenty of water, then
drain and rell the pan.
* If the water ow stops, check the water pump
to see if the shaft and impeller turn freely. See
the WATER PUMP TROUBLE-SHOOTING
PROCEDURE section.
* It is always good practice to clean your tile saw
after each day’s use. Drain the water and clean
out the pan. Clean the rails. Before storing, it is
good practice to wipe or spray rails with water-
soluble oil (like, WD-40 or equivalent).
Entrust all repairs to your authorized dealer
only.