13
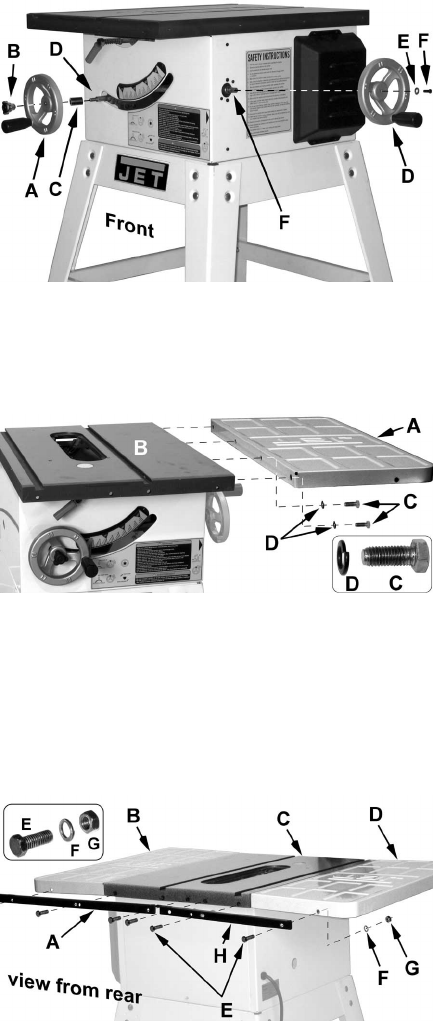
Handwheels
Referring to Figure 6:
The JWTS-10 Table Saw comes equipped with two
handwheels which look identical except for the
mounting holes as follows:
1. On the front of the table saw slide the bushing
(C) onto shaft (D) followed by the handwheel
(A) with the larger mounting hole, making sure
to line up the flat side in the hole with the flat
side on the shaft.
2. Fasten in place with lock knob (B).
3. Slide the remaining handwheel (D) with the
smaller mounting hole onto the shaft (F) on the
right side of the table saw, lining up the flat side
in the hole with the flat side on the shaft.
4. Secure with an M5 lock washer (E) and M5x12
socket head cap screw (F).
Extension Wings
Referring to Figure 7:
1. Attach the right extension wing (A) to the table
(B) on the right side using four M8 hex cap
screws (C) and four M8 lock washers (D).
Hand-tighten only at this time.
2. Repeat for the left side.
Rear Guide Rail
Referring to Figure 8:
Required Fastening Hardware:
A – 1 ea – Rear Rail (Long)
H – 1 ea – Rear Rail (Short)
E – 6 ea – Hex Cap Screws (M8x20)
F – 6 ea – Lock Washers (M8)
G – 6 ea – Hex Nuts (M8)
Required Tools:
Two 12mm wrenches
1. Place the long rail (A) against the back of the
right extension (B) and table (C). Line up the
mounting holes.
2. Insert three hex cap screws (E) through the
rail, extension and table.
3. Place lock washers (F) and hex nuts (G) on the
threaded ends of the screws and hand-tighten
only at this time.
4. Place the short rail (H) against the back of the
table (C) and left extension (D). Line up the
mounting holes.
Figure 6
Figure 7
Figure 8
5. Insert three socket head cap screws (E)
through the rail; extension and table.
6. Place lock washers (F) and hex nuts (G) on the
threaded ends of the screws and hand-tighten
only at this time.


