10
Drum Guard & Dust Port
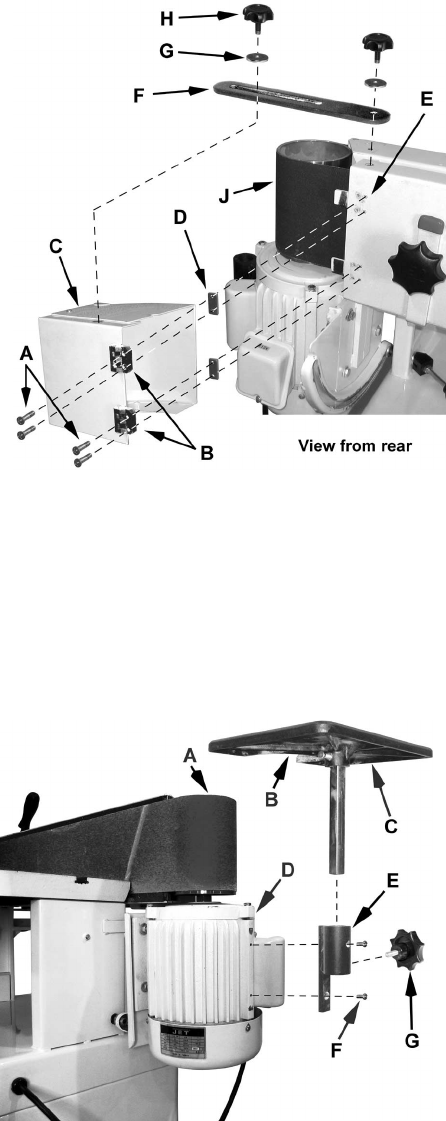
Referring to Figure 6:
Mounting the Drum Guard & Dust Port (referred to
below as drum guard)
1. Insert four M4x20 flat head screws (A) through
the two hinges (B) of the drum guard (C). Then
place two rectangular spacers (D) on the
threaded ends of the screws.
Note: Orient the spacers so the slightly
rounded side sits against the hinge and the
edge farther from the screws lines up with the
edge of the hinge.
2. Secure the drum guard (A) to the belt guard on
the rear side of the sander by threading the
screws through the mounting holes (E) in the
belt guard. Tighten the screws.
Mounting the Connection Plate
3. Place the drum guard (C) in the closed position
– this will cover the drive drum (J).
Note: You may have to slightly lift the cover
when closing in order to clear the motor case.
This is normal.
4. Place washers (G) on two small lock knobs (H)
and then insert the threaded end of one lock
knob through the slot of the connection
plate (F) and the other lock knob through the
hole of the connection plate.
5. Secure the slotted side of the extension plate
to the drum guard (C) and the side with the
hole to the belt guard (E).
When repositioning the drum guard, slightly loosen
both lock knobs, open or close the cover, then
secure the lock knobs.
Extension Table
Referring to Figure 7:
1. Attach the bracket (E) for the extension table to
the side of the motor housing (D) and secure
with two socket head cap screws (F).
2. Slide the shaft of the extension table (C) into
the bracket (E), positioning the table so the
opening (B) wraps around the drive drum (A).
3. Insert lock knob (G) into the threaded hole on
the side of the bracket (E) visible from the rear
of the sander.
Figure 6
Figure 7


