


14
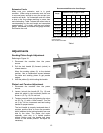
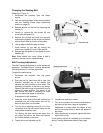
Motor Mount Tracking Adjustment
Referring to Figure 14:
The OES-80CS comes with tracking adjustment
bolts (A) on the motor plate. These are set at the
factory and should not require any further
adjustment. If, however, you are not able to track
the belt with the Belt Tracking Adjustment
described in the previous section, the motor mount
bolts will have to be adjusted.
Note: The Motor Mount Tracking Adjustment is a
course adjustment. Use the Belt Tracking
Adjustment first for fine adjustment. If it cannot be
adjusted, then use the procedure described below.
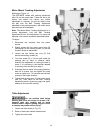
To adjust:
1. Disconnect the machine from the power
source.
2. Slightly loosen the four motor mount nuts (B)
just enough so the tracking screws (A) can be
turned to make an adjustment.
3. Loosen the two locking hex nuts (C) that
secure the tracking screws (A).
4. Turn one screw (A) a 1/4 turn and rotate the
sanding belt by hand to observe which
direction the adjustment is causing the belt to
move. If it is traveling in the direction needed
to correctly track the belt go to step 6.
5. If the belt starts to travel in the wrong direction,
back off a quarter turn and tighten the other
screw a quarter turn. This should start the belt
moving in the proper direction.
6. Tighten both locking nuts (C) and motor mount
nuts (B). Then return to the Belt Tracking
Adjustment section (previous page) and again
attempt to fine tune the tracking.
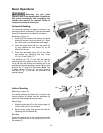
Table Adjustment
Do not position table below
sanding belt! Keep an overlap of at least 1/16”
between table and sanding belt to avoid
material and/or fingers getting caught! Failure
to comply may cause serious injury!
1. Loosen two lock knobs (A, Fig. 15).
2. Raise or lower work table to desired level.
3. Tighten two lock knobs.
Figure 14
Figure 15