


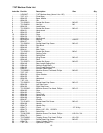
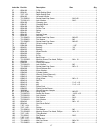

12
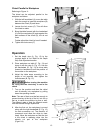
6. Reinstall the chisel bushing (F) and secure
it loosely with the lock screw (E).
7. Reinstall the chisel and bit (refer to the
Installing Chisel and Bit section).
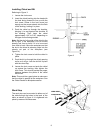
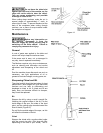
Depth Stop Rod Adjustment
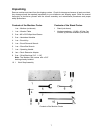
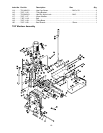
Referring to Figure 9:
A depth stop rod (A) is provided to limit the
depth of the chisel. To adjust:
1. Loosen lock lever (B) and lower the depth
stop rod (A) until it comes to rest on top of
the column stop (C).
2. With the operating handle (see Figure 2)
lower the head (E) until the chisel (D) is at
the desired depth.
3. The depth stop rod (A) should still be
resting on top of the column stop (C).
4. Tighten the lock lever (B).
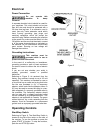
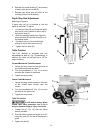
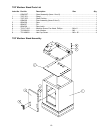
Table Position
The 719T Mortiser is equipped with two
handwheels for table (E, Fig. 10) positioning. In
addition, the table can be tilted up to 35° for
angle mortising.
Forward/Backward Table Movement
1. Loosen the wing screw on the right side of
the middle base under the table.
2. Turn the handwheel (A, Fig. 10) to move
the table the forward or backward.
3. Tighten the wing screw.
Lateral Table Movement
1. Loosen the wing screw located on the back
of the middle base located near the
column.
2. Turn the handwheel (B, Fig. 10) to move
the table to the right or left.
3. Tighten the wing screw.
Table Tilt Control
The tilt table is heavy. When
raised, take extra precaution not to let it
drop on hands or fingers. Injury can result.
1. Loosen bolt (C, Fig. 10) with the 23mm
wrench provided.
2. Pivot the table to adjust the angle up to 35°
using the scale (D) on the tilt bracket as a
guide.
3. Tighten the bolt (C).
A
B
C
D
E
Figure 9
Figure 10