


9
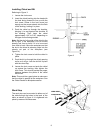
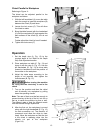
Installing Chisel and Bit
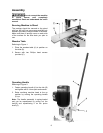
Referring to Figure 3:
1. Loosen the lock screw.
2. Insert the chisel bushing into the head with
the hole facing forward to line up with the
lock screw. Screw in the lock screw just
enough so the screw extends into the hole
of the bushing, holding it in place.
3. Push the chisel up through the bushing,
bringing it to rest against the shoulder of
the bushing. Then lower the chisel
approximately 1/16" to 3/16", depending on
the type of wood being worked.
Note: Set the slot in the side of the chisel to the
left or right, if the workpiece is to be moved
laterally and front or back if it is to be moved
from front to back. Move the workpiece so that
the slot in the chisel is releasing chips into the
already cut part of the workpiece (see
Figure 14).
4. Tighten the lock screw to hold the chisel in
place.
5. Push the bit up through the chisel opening
as far as it will go. Lock the drill bit in place
with the chuck key.
6. Loosen the lock screw and push the chisel
up against the bushing, then tighten the
lock screw. This should provide the proper
distance between the points of the chisel
and the bit.
Note: This would be a good place to make sure
that the chisel is parallel to the workpiece. See
the Chisel Parallel to Workpiece section.
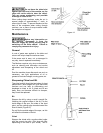
Work Stop
The work stop can be mounted to either end of
the table through the holes in the back of the
table, as shown in Figure 4. It is tightened into
place by means of thumbscrews.
Figure 3
T
HUMBSCREWS
HOLES
Figure 4