


13
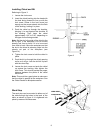
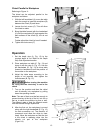
Chisel Parallel to Workpiece
Referring to Figure 11:
The chisel can be adjusted parallel to the
workpiece as follows:
1. With the left handwheel (A), move the table
back far enough to insert the workpiece (B)
between the chisel (D) and fence.
2. Loosen the lock screw (C). This will allow
the chisel to rotate.
3. Bring the table forward with the handwheel
(A) until the workpiece (B) rests against the
back surface of the chisel (D), but do not
force.
Further adjust the chisel by hand if needed.
4. Tighten the lock screw (C).
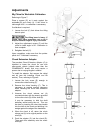
Operation
1. Set the depth stop (A, Fig. 12) to the
required depth of cut. Refer to the Depth
Stop Rod Adjustment section.
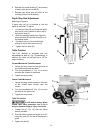
5. Place workpiece on table (C, Fig. 13) and
clamp it with the vise (A, Fig. 13). Use the
left handwheel (D, Fig. 13) to move table
forward or backward to suit the position of
the mortise on the workpiece.
6. Adjust the table stops according to the
length of cut required, then tighten the
thumbscrews (B, Fig. 13).
Before turning the machine
on, verify that the chuck key is not in the
chuck.
7. Turn on the machine and feed the chisel
and bit steadily into workpiece by pulling
down the operating handle.
Note: The rate of feed must be fast enough to
prevent burning at the tip of the bit, but not so
fast as to cause the machine to slow or stall.
The different rates of feed for different woods
must be learned through experience.
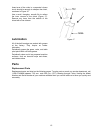
8. After the first cut, the workpiece is moved
along with the right handwheel (E. Fig. 13)
for each successive cut. The direction of
movement must allow the chips to clear
freely. Move the workpiece so that the slot
in the chisel is releasing chips into the
already cut part of the workpiece
(Figure 14).
Figure 11
C
D
A
B
Figure 12
A
B
C
D
E
F
Figure 13