


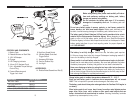
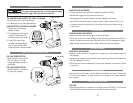


VARIABLE SPEED TRIGGER SWITCH
THIS TOOL IS CONTROLLED
BY A TRIGGER SWITCH:
• The speed of the Cordless Drill depends
on the amount of pressure you put on the
trigger.
• The more pressure you apply, the faster
the Cordless Drill will go.
• Release the pressure and the Cordless
Drill will slow down.
BUILT IN LED LAMP
• Press the trigger switch to light up the lamp. The lamp remains on while the
trigger switch is being pressed. The lamp goes out after releasing the trigger.
NOTE: Use a dry cloth to wipe the dirt off the lens of lamp. Be careful not to scratch
the lens of lamp, or it may lower the illumination.
Do not look into light or see the source of light directly.
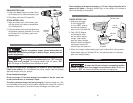
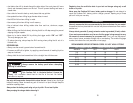
FORWARD /REVERSE AND TRIGGER LOCK LEVER
Be sure the trigger is released when changing the position of the lever.
Always store the tool in the “LOCKED/OFF” position.
Always check the direction of the Cordless Drill's rotation before use.
TO SELECT THE DIRECTIONS
OF ROTATION:
• To select forward Cordless Drill
rotation, press the trigger lock from
left to right flat against the Cordless
Drill body.
• To select reverse, press the trigger
lock lever in the opposite direction.
• The center position locks the tool.
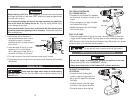
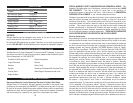
INSTALLING DRILL BIT INTO KEYLESS CHUCK
Before inserting a drill bit or other accessory, make sure the forward/reverse
and trigger lock lever is in the center “OFF” position to prevent accidental starts
that may result in injury.
Do not attempt to tighten drill bits (or any other accessory) by gripping the
front of the chuck and turning the tool on. This may cause personal injury
and/or damage to the chuck.
When removing the bit from the tool, avoid contact with skin and use proper
protective gloves when grasping the bit or accessory. Accessories may be hot
after prolonged use.
1. Hold the rear end of the chuck in
one hand and use the other hand to
rotate the front end in a counter-
clockwise direction to open the jaws
of the chuck.
2. Insert the shank of the bit (or other
accessory) fully into the keyless
chuck, taking care to keep the bit in
the center of the jaws of the chuck.
3. Turn the front end of the chuck clockwise to hold the bit in place.
4. Tighten securely by turning the front end of the chuck clockwise while holding
the rear end.
OPERATING THE DRILL
Never tape the trigger switch down to provide continu-
ous high speed. The tool may fail under such conditions causing fire or
personal injury.
WARNING
13
TRIGGER
LOCK
TRIGGER
SWITCH
LED LIGHT
HOLD HERE
HOLD HERE
RELEASE
GRIP
FORWARD
LOCK
REVERSE