


• The .035” (0.8mm) nozzle may be used for a
fine cut. Larger nozzles will work and provide
longer life at the expense of a larger cut.
• Do not allow the torch cable or body to contact
hot surface.
• The best quality cut is obtained by reducing the
current to a level that is adequate for the maxi-
mum travel speed.
• Aluminum, copper and other nonferrous metals
typically require more current than the same
thickness of steel. Treat these as a thicker sec-
tion of steel if good results are not obtained.
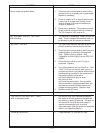
Expanded Metal:
Output set near mid-range.
• Cut it as you would light gauge sheet metal.
• Expanded metal is pilot arc intensive. After
about 30 seconds of cutting, the pilot arc will
change from a bright continuous arc to a discon-
tinuous one which will sputter slightly. It will stay
in this mode as long as metal has been cut in
the previous 5 seconds. If metal is not cut in the
previous 5 seconds, the arc will shut off and the
machine will go into postflow.
•If the trigger is continuously pressed and
released to obtain the bright pilot arc for long
periods of time, the machine will go into pilot arc
duty cycle limit. This is a 20 seconds out of 80
seconds pilot duty cycle. The pilot arc is dis-
abled in the limit period. Pilot arc duty cycle
limit is indicated by alternately flashing “OUT-
PUT ON” and “FAULT” LED’s.
• Placing a thin piece of scrap sheet metal above
the area to be cut and cutting through both can
make the job easier.
• Do not allow the torch cable or body to contact
hot surfaces.
Thick Sections of Metal
Output set above mid-range.
• The best quality and consumable life will be
obtained by holding the torch nozzle off the sur-
face about 1/8” (3.2mm). Output control should
be sent in the red range only. Do not touch the
nozzle to the work or carry a long arc.
• Use the S24114 Drag Cup to protect the torch.
The only reason not to use the Drag Cup when
the output control is in the blue or red regions is
in special tight corners. Always hold at least a
1/8” (3.2mm) standoff in those situations and
use the S18817 shield cup.
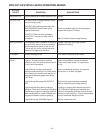
• Set the current to the minimum necessary to
make the cut.
• Use the .052” or .042” (1.2 or 1.0mm) nozzle
size. DO NOT use the .035” (0.8mm) nozzle.
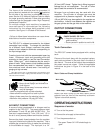
• Pierce the plate by slowly lowering the torch
onto it at an angle of about 30° to blow the
dross away from the torch tip and slowly rotate
the torch to a vertical position as the arc
becomes deeper.
• Where possible, start the cut from the edge of
the workpiece.
• Keep moving! A steady speed is necessary.
Do not pause.
•
Do not allow the torch cable or body to contact
hot surfaces.
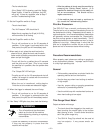
Gouging:
Output set to maximum.
• Use the gouging nozzle S18497-4
• Use the Shield Cup.
• Bring the torch slowly towards the work at about
a 30° angle as if piercing the plate. Blow the
molten metal away from the torch.
• Do not touch the nozzle to the work.
• The air pressure may be raised to about 75 psi
(517 kPa) to aid in metal removal.
• This process will blow a lot of molten metal and
dross.
BE CAREFUL! Blow the dross away
from the torch, away from the operator and
away from flammable objects.
• Do not allow the torch cable or body to contact
hot surfaces.
• Performance is similar to air carbon arc gouging
with a 1/8” (3.2mm) carbon electrode.
– 13 –