


– 22 –
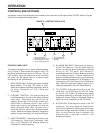
OPERATION
9. Set the Afterflow time with the Seconds Up/Down
keys. Afterflow time provides shielding gas flow
(and cooling water, if used) after the weld. Use
short Afterflow times with low currents and small
tungstens, long afterflow times at high output
currents with large tungstens.
10. Press and release the Arc Start Switch, and set
the gas flow meter. The welder is now ready for
welding.
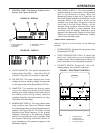
11. Position the tungsten electrode at the start of the
weld at a 65 to 75 angle with the horizontal so
that the electrode is approximately 1/8” (4mm)
above the work piece. Press the Arc Start Switch.
This opens the gas and water valves to
automatically purge air from the hose and torch.
After a 0.5 second preflow time, the high
frequency becomes available to strike the arc.
12. Hold the Arc Start Switch down until an arc is
established. The arc will start at a low current
value. Release the Arc Start Switch. At this point,
the Square Wave TIG 255 will quickly ramp up to
the welding current, and the weld will continue
indefinitely. Press the Arc Start Switch a second
time to initiate a 5-second downslope. The current
will go down to a crater fill current that is equal to
25% of the welding current. Release the Arc Start
Switch to stop the arc and start the Afterflow timer.
After the Afterflow time has expired, the gas and
water valves will close. To make another weld,
repeat steps 11 and 12.
TIG WELDING SEQUENCE OF OPERATION
(4-Step Mode)
1. Connect an Arc Start Switch to the Remote
Receptacle.
2. Turn the welder, gas supply and water supply (if so
equipped), on. The Control Panel Display and red
LEDS will illuminate when the power is on.
3. Select the TIG 4-Step Weld Mode.
4. Select the Local current control. Set the output
current using the Amps Up/Down keys. The output
current setting will be displayed on the Ammeter. On later
version machines, remote control is also available in TIG 4-
Step mode on codes 10022 and higher utilizing ROM
version S21228-4 and higher provided that the remote
control used has separate Arc Start and Output Control
mechanisms.
5. Select Continuous High Frequency if welding with
AC polarity, or Start Only High Frequency if
welding with DC- polarity. High Frequency Off can
be used for scratch start welding.
6. Select AC or DC- electrode polarity. See Table 2.
7. If welding with AC polarity, select Auto Balance™.
This gives the optimum ratio between cleaning and
penetration, automatically adjusted for the output
current. If manual adjustment of the AC Wave
Balance is desired, select Manual Balance, and
adjust the wave balance with the Cleaning and
Penetration keys. See the Advanced Features
section for more information on setting and using
the AC Wave Balance.
8. Select TIG Pulser On or Off. If the TIG Pulser is on, adjust
the pulse frequency with the Pulses Per Second Up/Down
keys. See the Advanced Features section for more
information on setting
and using the TIG Pulser.
10. Press and release the Arc Start Switch, and set
the gas flow meter. The welder is now ready for
welding.
11. Position the tungsten electrode at the start of the
weld at a 65 to 75 angle with the horizontal so
that the electrode is approximately 1/8” (4mm)
above the work piece. Press the Arc Start Switch.
This opens the gas and water valves to
automatically purge air from the hose and torch.
After a 0.5 second preflow time, the high
frequency becomes available to strike the arc.
12. Hold the Arc Start Switch or Amptrol down until an
arc is established. If using an Amptrol, read the
section on Hand and Foot Amptrol Operation.
Release the Arc Start Switch or Amptrol to stop
the arc and start the Afterflow timer. After the
Afterflow time has expired, the gas and water
valves will close. To make another weld, repeat
steps 11 and 12.
ADVANCED TIG WELDING FEATURES
AC Wave Balance and Auto Balance™
AC Wave Balance is a feature unique to square wave
TIG power sources. It is active only in AC TIG mode.
It controls the amount of positive and negative current
in the AC output.
The Square Wave TIG 255 allows the operator to
select Auto Balance™. This selection provides
automatic adjustment of the AC Wave Balance; it is
suitable for most welding conditions. Auto Balance
gives the ideal amount of cleaning and penetration,
based on the welding current output.
Manual adjustment of the AC Wave Balance is also
possible. Select the Manual Balance key, and the
Balance setting will appear in the Momentary Display.
Manual Balance settings vary from +5 (maximum
cleaning) to -10 (maximum penetration). A setting of
0 yields a balanced output (equal amounts of cleaning
and penetration). Use the following as a guide when
setting the Balance manually: