


14 15
Starting and Stopping the Tool
Always hold the trigger handle fi rmly because
the starting and stopping action of the motor
may cause the handle to move up or down
slightly. Always secure the turntable by tight-
ening the miter angle lock knob.
1. To start the motor, pull the trigger.
2. To stop the motor, release the trigger.
WARNING
To reduce the risk of injury, do not
rely on the brake as a safety feature.
Always wait until the blade stops
completely before allowing any-
thing near the blade.
Adjusting the Fences
1. Loosen the fence lock knobs.
2. The left side fence can slide side-to-side
to the desired position to allow for a left
bevel or left compound miter cuts.
3. The right side fence can be removed for
a right bevel or right compound miter
cuts by pulling the fence up.
4. Always position the fences properly for
maximum work support.
5. Tighten the fence lock knobs securely
before making a cut.
NOTE: If either fence has any movement
forward to backward, tighten the fence
set screw, located on the back of each
fence slot.
Lights
Use the on/off switch to turn on the turntable
lights before making a cut. Turn off the lights
when cutting is complete.
WARNING
To reduce the risk of injury, make
sure all adjustments are securely
locked before making a cut.
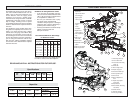
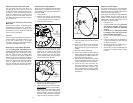
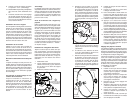
Making a Chop Cut
The sliding mechanism can be locked to use
the saw for chop cuts (cuts not requiring the
use of the slide mechanism). Cut workpieces
with chop cuts whenever possible. A chop
cut is always faster and easier to make than
a sliding cut.
1
2
3
Fig. 7
1. Slide the saw head all the way back
(1).
2. Tighten the slide rail lock (2).
3. Plug in the tool. Raise the saw head
completely.
4. Select the desired angles following the
steps in "Adjusting the Miter Angle" and
"Adjusting the Bevel Angle".
5. Place the workpiece on the turntable and
line up the cut.
6. Support the workpiece using any of
the methods described in "Support the
Workpiece Properly".
7. Start the motor. Wait a few seconds
for the blade to reach full speed. Then
gently lower the saw head into the work-
piece all the way through the cut (3).
8. Always allow the saw to do the work.
Forcing the tool may stall or overheat
the motor.
9. After the cut is complete, release the
trigger and wait for the blade to stop
completely. Then gently raise the saw
head and remove the workpiece. Always
unplug the tool before retrieving loose
cut-off pieces from inside the guard
area.
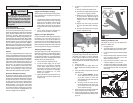
Making a Sliding Cut
Wider workpieces can be cut using the slid-
ing mechanism.
4
1
3
2
Fig. 8
1. Make sure that the slide rail lock is loose
and that the saw head moves freely
back and forth.
APPLICATIONS
Recommended Materials and
Applications
The following materials can be cut with the
slide compound miter saw. There are many
types of saw blades available. Always use
the proper blade for the particular material
and application.
Wood - solid wood, plywood, particle
board, MDF (medium density fi berboard),
HDF (high density fi berboard), melamine
laminated particle board, formica lami-
nates, hardboard (masonite).
Plastics - PVC, CPVC, ABS, solid surfac-
ing materials (such as Corian
®
), and other
plastic materials.
Nonferrous Metals - aluminum, brass,
copper, and other non-ferrous materials.
Cutting Non-Square Materials
Cutting Round (Cylindrical) Materials
"V" shaped blocks can be used to support
round materials like closet rod and plastic
pipe.
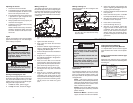
Aluminum Sash and Other Channel Type
and Materials
Aluminum sash material can be supported
with blocks to prevent it from deforming while
it is being cut.
Fig. 9
Clamp
Fence
Base
Wood support
block
Aluminum
material
Wood support
block
WARNING
Do not cut stone, brick, concrete, or
ferrous metals (iron, steel, stainless
steel, or alloys of these metals) with
this saw.
Do not use abrasive wheels with this
saw.
Dust created by cutting these mate-
rials and/or using abrasive cut-off
wheels can jam the blade guard and
possibly cause personal injury.
2. Select the desired angle following the
steps in "Adjusting the Miter Angle" and
"Adjusting the Bevel Angle".
3. Place the workpiece on the turntable and
line up the cut.
4. Raise saw head and pull it out OVER
the workpiece WITHOUT cutting (1).
5. Start the motor. Wait a few seconds for
the blade to reach full speed.
6. Press down on saw head (2).
7. Push saw through the cut (3).
8. After the cut is complete, release the
trigger and wait for the blade to stop
completely. Then gently raise the saw
head (4) and remove the workpiece.
Always unplug the tool before retriev-
ing loose cut-off pieces from inside the
guard area.