


MultiAccess Quick Start Guide Connecting & Starting the MultiAccess
Multi-Tech Systems, Inc. PN 82001423L 19
Catuion: If you change this to yes and put a “!” before the login name, you could be setting up a potential
security risk. You can use this in an emergency situation if your radius server goes down.
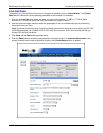
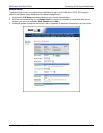
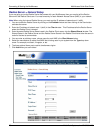
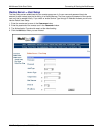
5. Enter the IP address of your main Radius server in RADIUS Server Address 1 window.
Note: When using the internal Radius Server, both server and client must used the IP address network card 1
(eht0).
6. Enter the UDP port number used by your main Radius server in the first Port window.
7. Enter the IP address of your main Radius Accounting host in the RADIUS Accounting Address 1 window.
8. Enter the UDP port number used by your main Radius Accounting host in the second Port window.
9. If you have a second (backup) Radius server, enter the IP address for the backup Radius server in the
RADIUS Server Address 2 window. Follow that by enterring the port number of the backup Radius server in
the third Port window. Then enter the backup Radius Accounting host in the RADIUS Accounting Address 2
window followed by the port number for the backup host in the fourth Port window.
10. Enter the Shared Secret for the Radius Server in the RADIUS Shared Secret window.
11. In the Remote Host Address window, set this field to the starting IP address of your IP address pool
(addresses that are to be assigned to the dial in users). The IP address needs to have a + (plus symbol) after
the number (e.g., 192.168.1.150+). The plus symbol instructs “Portslave” to create an address pool starting
with the address you enterred. Portslave determines the “ending” address number by adding up all the Line
Interface selections that have their “Port Selection” set to “All”. If the MultiAccess server has multiple line
interface modules and all ports are to use an address pool, set this field to the same address
(192.168.1.150+) for each line interface.
12. Enter the IP address of your primary name server in the DNS Server Address 1. This establishes the name
server for remote access users. If you have a backup DNS server, enter the IP address of your backup DNS
Server in the DNS Server Address 2 window.
13. Click the Save button when you are finished.
14. Repeat the above procedure for each line interface.