


HPLA/HPHA-SERIES 46" WALK-BEHIND TROWEL — OPERATION AND PARTS MANUAL — REV. #6 (07/06/10) — PAGE 21
HPLA/HPHA-SERIES 46" TROWEL — ASSEMBLY AND INSTALLATION
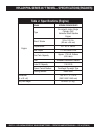
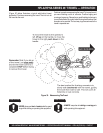
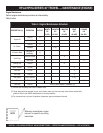
Pre-load Adjustment (Quick-Pitch™ Models Only)
1. After the Quick-Pitch™ handle has been installed on the
trowel, spring pre-load adjustment will be required.
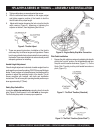
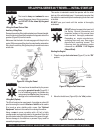
2. Locate the adjustment screw on the underside of the handle
tube (Figure 15).
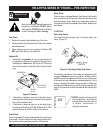
Figure 15. Pre-load Adjustment
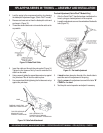
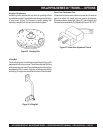
Figure 14. Cable Yoke Attachment
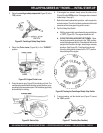
3. A
decal
has been placed on the side of the handle tube to
assist the user in the adjustment of the spring.
4. Align the
arrow
on the adjustment screw with the letter "B"
COMBO
on the
decal
.
5. Test the pitch control operation and adjust if necessary.
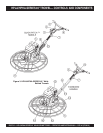
5. Insert the cable end through the yoke eyelet (Figure 14)
Tighten the first brass set nut by hand to remove all the
slack from the cable.
6 Using a wrench, tighten the second brass set nut up against
the yoke boss. This will lock the cable in place.
7. Use a wrench and finish tightening the first brass set nut up
against the yoke boss.
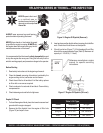
2. Lock the spring in the compressed position, by releasing
the blade pitch adjustment trigger, (Quick-Pitch™ model).
3. Remove one brass set nut from the blade pitch cable end
as shown in (Figure 13).
4. Thread the second brass set nut towards the cable as far
as possible.
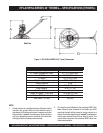
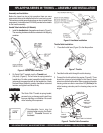
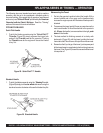
Figure 13. Blade Pitch Cable
YOKE
THREAD CABLE END
THROUGH YOKE EYELET
TIGHTEN SECOND
BRASS SET NUT
AGAINST YOKE BOSS
USE A WRENCH TO
TIGHTEN FIRST BRASS
SET NUTAGAINST YOKE BOSS