


14
O.A.S. 2007
c
10 HP Pulley Drive Owners Manual
Maintenance of Fan / Blower (Cont.)
2.) Cleanliness - Keep both the interior and exterior of the motor free from dirt, water, oil and grease.
3.) Safety - Motors should be installed, protected and fused in accordance with latest issue of
National Electrical Code, NEMA Standard Publication No. MG2 and local codes. Rotating parts such
as pulleys, coupling, external fans, and unusual shaft extensions should be permanently guarded.
Keep hands and clothing away from moving parts. Electrical repairs should be made by trained,
qualified personnel only.
4.) Location - The free flow of air around the motor should not be obstructed. The motor should
never be placed in a room with hazardous processes, or where flammable gases or combustible
material may be present, unless it is specifically designed for this type of service.
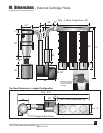
5.) V-Belt Drive -
A.) Align sheaves carefully to avoid axial thrust on motor bearing. The drive sheave on the motor
should be positioned toward the motor so it is as close as possible to the bearing.
B.) When adjusting belt tension, make sure the motor is secured by all mounting bolts before
tightening belts.
C.) Adjust belt tension to belt manufacturers recommendations. Excessive tension will shorten
bearing life. Insufficient tension shortens bearing life, can reduce fan performance and may
cause vibration. Belts may slip during start-up, but slipping should stop when fan reaches full
speed.
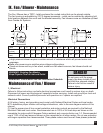
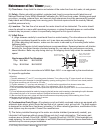
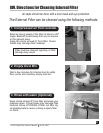
X
Y
E
D
C
Key E locks moveable
side(s) of sheave after
pulley has been adjusted.
Do not operate
Sheave with flange
projecting beyond
the hub end.
6.) Condensation Drain Plugs - All explosion proof and totally enclosed motors are equipped with
automatic drain plugs, which should be kept free of oil, grease, paint, grit and dirt. The drain system
is designed for normal floor (feet down) mounting. For other mounting positions, modification of the
drain system may be required. Consult the manufacturer.
7.) The factory installed bearings in the motor are double shielded (permanently sealed), pre-
lubricated, ball bearings without grease fittings and dont need relubrication. The bearing part
numbers are as follows: Drive End / 6309ZZ, Opposite Drive End / 6307ZZ. If the bearings ever
need replacing, the motor should be taken to an EASA (Electrical Apparatus Service Association)
certified shop to ensure proper installation.
D.) Sheaves should be in accordance to NEMA Spec. MG-1 or as approved by the manufacturer
for a specific application.
Adjusting:
1.) Loosen setscrews Y and C in moving parts of sheave. Turn pulley so Key E drops down & out of the way.
2.) Adjust sheave pitch diameter for desired speed by opening moving parts 1/2 or full turns from closed position.
Do not open more than six full turns for B belts.
3.) Tighten setscrew Y over key and setscrew C over flat surface machined into sheave center hub.
Torque set screws to the following values: 100 in. lbs. minimum to 130 in. lbs. maximum.
4.) Put on belts after elevating motor mount plate and adjust belt tension to proper value. Do not force belts over
grooves.)
5.) Future adjustments should be made by loosening the belt tension and increasing or decreasing the pitch diameter
of the sheave by half or full turns as required. Readjust belt tension before starting drive.
6.) Be sure that all keys are in place and that all setscrews are torqued properly before starting drive. Check
setscrews and belt tension after 24 hours of service.
7.) Replace shaft and pulley guards covers.
Set screw X locks
sheave to motor shaft.
Replacement Belt Part Numbers
10hp
15hp
B44 Belt
BX44 Belt
BLZ440000
BLZ440001