


8
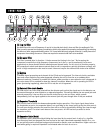
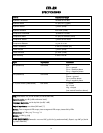
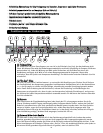
SSeettttiinngg tthhee CCoonnttrroollss
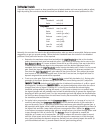
If you are starting from scratch or have something out of whack and do not know exactly what to adjust‚
begin by setting the controls so that all functions are disabled. Here are the control positions for this:
EExxppaannddeerr
Threshold
Ratio
CCoommpprreessssoorr
Threshold
Ratio
Attack
Release
Limit
Gain
Low Cut
De-ess
min (off)
min (1:1)
max (+20 dB)
min (1:1)
center (50 mSec)
center (.5 sec)
max (off)
min (0 dB)
out (off)
out (off)
Naturally‚ the controls that need to be adjusted depend on what you want to accomplish. Below are some
suggestions to get you up and running. Follow the order listed and leave the controls in the disabled
positions if that particular function is not required.
1. Determine the maximum output level and adjust the
LLiimmiitt TThhrreesshhoolldd
so that‚ at the loudest
peaks‚ the output level never exceeds this point. (The action of the limiter can be seen on the
GGaaiinn RReedduuccttiioonn MMeetteerr
. If it never activates‚ there will be no LED activity.) One way to do this is
to deliberately increase the input to the compressor until the desired maximum level is
exceeded‚ then turn the
LLiimmiitt TThhrreesshhoolldd
control counter-clockwise until it limits it to the correct
gain. Reset the input level to the nominal setting (0 dBu average). An alternate method is to
turn down the
LLiimmiitt TThhrreesshhoolldd
until gain reduction has just occurred. Then‚ adjust the output
level control to set the desired output level. If the limit is set too low‚ the signal will lose its
dynamic range and the sound will be squashed.
2. To set up a noise gate‚ first turn the
EExxppaannddeerr RRaattiioo
control fully clockwise (1:5). During quiet
passages of the source (between songs‚ when the mics are not being used‚ etc.) adjust the
EExxppaannddeerr TThhrreesshhoolldd
clockwise until gain reduction is indicated (a reduction of -9 dB is a good
starting point). Re-adjust the
EExxppaannddeerr RRaattiioo
to set the desired gating action when the source
changes from noise to signal. A setting of 1:1.2 has little action and can tolerate higher
threshold settings without coloring the sound; 1:5 will cause an abrupt turn on and off when
the signal changes and will probably need a lower threshold setting to prevent the signal from
dropping off when you don’t want it to. You may need to go back and adjust the threshold after
the ratio has been changed since the soft-knee circuitry has more affect at lower ratios‚ making
the transition point less obvious.
3. For typical voice compression‚ set the
CCoommpprreessssoorr RRaattiioo
control to 4:1 (a range of 2:1 to 6:1 is
common) and adjust the
CCoommpprreessssoorr TThhrreesshhoolldd
until the desired amount of gain reduction is
seen on the meter. This is a personal preference but continuous gain reduction greater than -9
dB (especially with higher ratios) could be excessive and create pumping/breathing artifacts as
the signal rises and falls. Lower ratios will have a more gentle affect. Adjust the
AAttttaacckk
control
to low values to suppress leading-edge spikes or to high values to let them through (often used
to pass through the click of a drum hit). The
RReelleeaassee
control is adjusted to smooth the
transition as it comes out of compression. Too quick a release will cause the signal to sound
artificial. A fast attack and a short release time will cause the compressor to track the signal
very closely (and keep the dynamic range very limited)‚ but can severely impact the sound. (A
50 millisecond attack and a .5 second release time are good starting points.)