


8 C4603M-A (5/09)
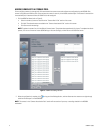
ADDING CAMERAS TO A STORAGE POOL
Prior to assigning cameras to a storage pool, Pelco recommends that camera names and attributes are configured using the WS5000. Each
camera is assigned to one NSM at a time. Once assigned, the camera is seen only in that NSM’s associated pool. If the camera is removed from
the associated pool, it becomes visible to all NSMs and can be reassigned.
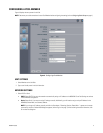
1. Click the NSM Pool button (refer to Figure 5).
a. Select the cameras you want to record from the “Cameras Not in Pool” section of the screen.
b. Click Add. The selected cameras are added to the “Cameras Associated to Pool” section of the screen.
c. Click Save to retain the settings.
NOTE: To update the camera lists, click the Refresh Cameras button. The update takes approximately 10 minutes. To complete the refresh
process, click on one of the other screens (NSM Settings or Accounts Settings), and then return to the NSM Pool screen.
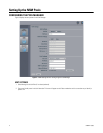
Figure 5. NSM Pool Settings Screen
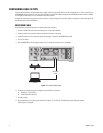
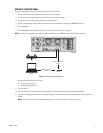
2. When the configuration is complete, click to log out of the Web application, and then disconnect the crossover or straight through
cable from Ethernet port 2 on the NSM5200.
NOTE: The cameras in the "Cameras Associated to Pool" section will not record until you set up a recording schedule in the WS5000
workstation.