


C4603M-A (5/09) 9
CONFIGURING A POOL MEMBER
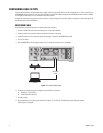
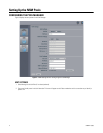
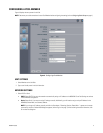
Figure 6 displays the setup screen for the Pool.
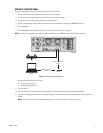
NOTE: Reconnect your cable connections for each Pool Member before configuring the settings (refer to Configuring Cable Setups on page 4).
Figure 6. Configuring a Pool Member
UNIT SETTINGS
1. Select Member as the Unit Role.
2. Type a user-friendly name in the Unit Name box.
NETWORK SETTINGS
1. Select DHCP or Static.
• DHCP: Select DHCP if you want the network to automatically assign an IP address to the NSM5200. Go to Pool Settings to continue
the Pool Member configuration.
• Static: Select Static if you want to assign IP settings manually. Additionally, you will need to assign a unique IP Address for the
NSM5200, Subnet Mask, and Gateway Address.
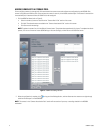
NOTE: If you change an IP address manually and click the Save button, “Restarting Services, Please Wait...” appears on the screen
momentarily, and then a Reboot NSM dialog box appears (refer to Figure 4 on page 7). After reviewing the reboot information, click
OK to close the dialog box.