


34
WARNING:
When servicing, use only identical replacement
parts. Use of any other part may create a hazard
or cause product damage.
WARNING:
Always wear safety goggles or safety glasses with
side shields during power tool operation or when
blowing dust. If operation is dusty, also wear a
dust mask.
GENERAL MAINTENANCE
Avoid using solvents when cleaning plastic parts. Most
plastics are susceptible to damage from various types of
commercial solvents and may be damaged by their use. Use
clean cloths to remove dirt, carbon dust, etc.
MAINTENANCE
WARNING:
Do not at any time let brake fluids, gasoline, petro-
leum-based products, penetrating oils, etc., come
in contact with plastic parts. They contain chemi-
cals that can damage, weaken or destroy plastic.
LUBRICATION
All of the bearings in this tool are lubricated with a sufficient
amount of high grade lubricant for the life of the unit under
normal operating conditions. Therefore, no further lubrica-
tion is required.
WARNING:
To ensure safety and reliability, all repairs should be
performed by a qualified service technician at an
authorized service center to avoid risk of personal
injury.
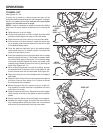
ADJUSTMENTS
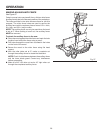
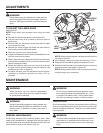
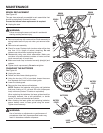
Fig. 42
LASER
BUTTON
HEX
KEY
LASER
MARK
APERTURE
ADJUSTMENT
SCREW
WARNING:
Before performing any adjustment, make sure the
tool is unplugged from the power supply. Failure to
heed this warning could result in serious personal
injury.
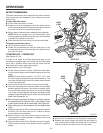
TO ADJUST THE LASER GUIDE
See Figure 42.
NOTE: Avoid direct eye exposure when using the laser
guide.
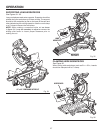
Set both the bevel angle and the miter table at 0°.
Use the work clamp or a C-clamp to secure a piece of
scrap wood.
Plug the saw into the power source and make a slight
cut to score the wood.
Release the switch trigger and allow the saw blade to
stop rotating before raising the blade.
Raise the saw arm and unplug the saw.
Loosen the blade bolt cover screw on the blade bolt cover
until the cover can be raised.
Gently raise the lower blade guard bracket so that lower
blade guard and blade bolt cover can be rotated up and
back to expose the laser.
Rotate the blade by hand until you can push and hold
the laser button and the laser is near the center of the
workpiece as shown in figure 42.
To adjust the laser, turn the adjustment screw counter-
clockwise or clockwise using the hex key (1/16 in.)
provided.
NOTE: When properly aligned, the laser should be on the
left edge of the kerf.
Once aligned, remove and store the hex key (1/16 in.).
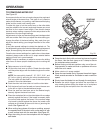
Replace the lower blade guard and blade bolt cover.
Retighten the blade bolt cover screw securely to prevent
guard movement (see page17, figure 12).
NOTE: Always make practice cuts on scrap wood before
cutting through your workpiece.