


15
ADJUSTMENTS
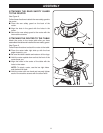
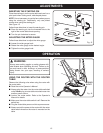
INSERTING THE STARTING PIN
Place the starting pin on the router table and use it as a
pivot point when cutting small, odd-shaped pieces.
NOTE: It is not necessary to use the fence when you are
using the starting pin. Additionally, only use piloted
cutters when using the starting pin.
See Figure 15.
Follow these directions to insert the starting pin.
Q Place the starting pin into the threaded hole to the
right of the router table throat opening.
Q Turn the pin clockwise to secure.
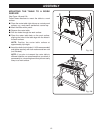
ADJUSTING THE MITER GAUGE
Follow these directions to adjust the miter gauge.
Q Loosen the miter gauge knob.
Q Rotate the miter gauge to the desired angle.
Q Tighten the miter gauge knob.
Fig. 15
OPERATION
WARNING:
Always wear safety goggles or safety glasses with
side shields when operating this tool. Failure to do
so could result in dust, shavings, or loose particles
being thrown into your eyes, resulting in serious
injury.
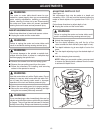
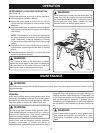
USING THE ROUTER WITH THE ROUTER
TABLE
Observe the following rules when using the router with
the router table.
Q Read the entire
Operator’s Manual
.
Q Always plug the router into the router table switched
outlet. Never plug a router table mounted router into
another power source.
Q Lock-on the router switch. Refer to the
Operator’s
Manual
for details.
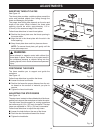
Q Make sure the router table switch is off. Remove the
switch key.
Q Plug the router table power cord into a power source.
Q Always control the power to the router with the router
table switch whenever the router is mounted on the
table.
Fig. 16
SWITCHED
OUTLET