17
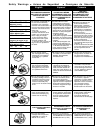
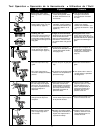
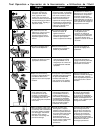
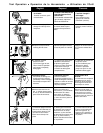
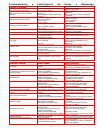
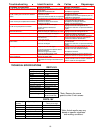
Troubleshooting Identificación de Fallas Dépannage
Problema o síntoma
La herranuebta bi arrabca i funciona
lentamente.
La herramienta no embute el tornillo en el
sustrato deseado.
La herramienta no embute el tornillo
completamente.
La herramienta no hace avanzar el tornillo.
El tornillo cae fuera del material de
intercalación durante el embutido.
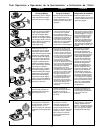
El botón de liberación de la broca no libera
la broca.
No se puede instalarla broca.
La broca deja caer el tornillo o el tornillo se
embute en ángulo.
Los tornillos se atascan.
El mecanismo de deslizamiento se “pega” o
retorna lentamente.
Recalentamiento de la herramienta.
Causa probable
La batería está descargada o la celda está
agotadal.
El interruptor del accionador está defectuoso.
La batería tiene poca carga.
La broca está gastada.
Se han excedido las capacidades de
potencia de la herramienta.
La profundidad de embutido no se ha
ajustado correctamente.
La broca está gastada o atorada.
La batería tiene poca carga.
El largo del tornillo se ha ajustado
incorrectamente.
Material de intercalación defectuoso.
Corona dentada gastada.
El largo del tornillo se ha ajustado incorrectamente
Tira no roscada a través del soporte tensor.
Las placas del embrague no están
alineadas.
La broca no está insertada correctamente
en el eje de embutido.
La broca no está alienada correctamente.
La herramienta se hace deslizar hacia
abajo durante el embutido.
La herramienta está desalineadd.
El largo del tornillo se ha ajustado
incorrectamente.
El tornillo no está bien asentado en el
material de intercalación.
La broca está muy desgastada.
La pieza de la boca está dañada o doblada.
Acumulación de suciedad en el mecanismo.
Resorte de retorno débil.
Batería descargada.
La aplicación de un impulso muy arduo
requiere demasiado par torsor.
Acción correctiva
Reemplace o recargue la batería.
Reemplace el interruptor del accionador.
Inserte una batería cargada.
Reemplace la broca.
Consulte en el manual de operaciones las
aplicaciones apropiadas.
Ajuste la profundidad de embutido para lograr
una penetración más profunda.
Reemplace o limpie la broca.
Inserte una batería cargada.
Consulte en el manual de operaciones el
ajuste correcto del largo del tornillo.
Lleve a un representante de servicio
autorizado de SENCO.
Consulte en el manual de operaciones el
ajuste correcto del largo del tornillo.
Sacuda ligeramente la herramienta mientras
acciona el botón de liberación.
Deje caer la broca en forma recta dentro de la
abertura.
Sacuda ligeramente la herramienta mientras
acciona el botón de liberación.
Sostenga la herramienta rmemente durante
el embutido.
Lleve a un representante de servicio
autorizado de SENCO.
Consulte en el manual de operaciones el
ajuste correcto del largo del tornillo.
Pruebe con otra tira de tornillos.
Reemplace la broca.
Lleve a un representante de servicio autorizado de SENCO.
Limpie el mecanismo
Lleve a un representante de servicio autorizado de SENCO
Permita que la herramienta se enfrie e inserte
una batería cargada.
Permita también que se enfrie y discontinúe el
uso en esta aplicación.
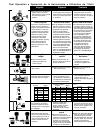
Problem or Symptom
Tool will not start or runs slowly.
Tool will not drive screw into desired
substrate.
Tool does not fully drive fastener.
Tool does not advance fastener.
Screws fall out of collation during drive.
Bit Release does not release bit.
Bit will not install.
Bit slips off screw or screw is driven
at an angle.
Fastener Jams
Slide Mechanism “sticks” or returns slowly.
Tool Overheats
Probable Cause
Battery is discharged or has dead cell.
Trigger switch is defective.
Battery is weak.
Bit is worn.
Power capabilities of the tool have been
exceeded.
Depth of drive not set properly.
Bit is worn or clogged.
Battery is weak.
Tool is in reverse.
Screw length is improperly set.
Defective collation material.
Worn sprocket.
Screw length improperly set.
Strip not threaded through tensioning bracket.
Clutch plates not aligned.
Bit not properly inserted into drive shaft.
Bit not properly aligned.
Clutch plates not aligned.
Tool slides forward during drive.
Tool is misaligned.
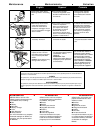
Bit is worn.
Screw length improperly set.
Screw not seated properly in collation material.
Bit severely worn.
“Nosepiece” damaged or bent.
Debris build-up in mechanism.
Weak return spring.
Battery is low.
Tough drive application requires too much
torque.
Corrective Action
Replace or recharge battery.
Replace trigger switch.
Insert fresh battery.
Replace bit.
Refer to operators manual for appropriate
applications.
Adjust depth of drive for deeper penetration.
Replace or clean bit.
Insert fresh battery.
Put in Forward.
Refer to operators manual for proper
adjustment of screw length.
Return to authorized SENCO service
representative.
Refer to operators manual for proper
adjustment of screw length.
Jog tool while actuating release button.
Drop bit straight into opening.
Jog tool while actuating release button.
Hold tool rmly while driving.
Return to authorized SENCO service
repesentative.
Replace bit.
Refer to operators manual for proper
adjustment of screw length.
Try another strip of fasteners.
Replace bit.
Return to authorized SENCO service repesentative.
Clean mechanism.
Return to authorized SENCO service repesentative.
Allow tool to cool and insert fresh battery.
Allow tool to cool and discontinue use in this
application.


