


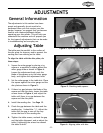


ADJUSTMENTS
-11-
The adjustments in this section have been
preset and generally do not need to be
performed when you first receive your disc
sander; however, we suggest that you become
familiar with these adjustments before
operating your disc sander. This will help you
understand the machine and will prepare you
for the types of adjustments that can be made
in troubleshooting and everyday use.
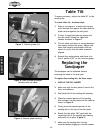
The table must be parallel to the surface of
the disc plate for accuracy and to prevent the
sanding disc from rubbing on the table.
To align the table with the disc plate, do
these steps:
1. Square the miter gauge by placing a try
square or a machinist’s square against the
miter gauge slide as shown in Figure 4.
Loosen the adjustment knob, push the
blade of the square up to the miter gauge
body, and tighten the adjustment knob.
2. Set the miter gauge in the table slot. Place
the square against the miter gauge and the
disc plate as shown in Figure 5.
3. If there is a gap between the blade of the
square and the disc plate, loosen the table
screws shown in Figure 6, and adjust the
table until there is no gap between the
square and the disc plate.
4. Install the sanding disc. See Page 12.
5. Check the gap between the table and the
sanding disc. It should be
1
⁄16". Adjust the
table until the gap is even all the way
across the face of the sanding disc.
6. Tighten the table screws, recheck the gap
and the table alignment, and re-adjust the
table if tightening the screws has caused
the table to shift.
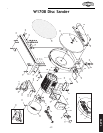
Figure 5. Checking table square.
Figure 4. Squaring the miter gauge.
Figure 6. Aligning table with disc.
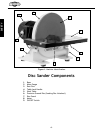
Adjusting Table
General Information
ADJUSTMENTS
1
/16"Gap
Table
Screws
Table
Screws