


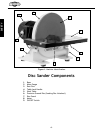


ADJUSTMENTS
-12-
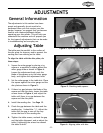
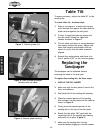
Figure 7. Checking table tilt.
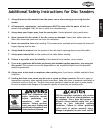
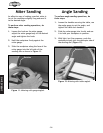
Figure 8. Slide covered sandpaper
between disc and table.
Figure 9. Remove paper backing
To ensure accuracy, adjust the table 90˚ to the
sanding disc.
To check table tilt, do these steps:
1. Place a try square or a machinist’s square
with the base flat against the table and the
blade vertical against the disc plate.
2. If there is a gap between the square and
the disc plate, loosen the table lock
handles as shown in Figure 7.
3. Tilt the table until there is no gap between
the square and the disc plate, tighten the
table lock handles and recheck with the
square to verify that the table remained
aligned.
4. Remove the angle pointer and place it so
that it points to 90˚ on the trunnion gauge.
The sandpaper can be replaced without
removing the table or the dust port.
To replace the sanding disc, do these steps:
1. UNPLUG THE DISC SANDER!
2. Make sure that the disc plate is free of dirt,
dust, and adhesive.
3. Peel back half of the sanding disc backing.
4. Slide the covered portion of the sanding
disc between the disc plate and the table as
shown in Figure 8.
5. Firmly press the exposed portion of the
sanding disc to the top of the disc plate.
6. Rotate the disc plate 180˚, peel back the
remaining half of the sanding disc backing
and press it into place (Figure 9).
7. Make sure the sanding disc is firmly
attached before plugging in the disc sander.
Replacing the
Sandpaper
Table Tilt
Gap