


-14-
W1751 25" Wide-Belt Sander
SET UP
Sanding Belt Installation
1. Before installing the belt, clean the protective
grease from the upper metal sanding belt roller as
per the Cleaning Machine instructions on
Page 11.
2. DISCONNECT THE SANDER FROM POWER, but keep
the air pressure applied into the machine.
3. Turn the sanding head lock lever counterclockwise
and remove the lever and the steel spacer block.
4. Locate the arrows on the inside of the sanding belt.
These arrows show the direction that the sanding
belt is designed to rotate during operation. Facing
the inside of the left-hand access door, the sanding
belt will rotate counterclockwise.
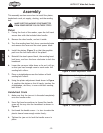
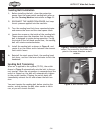
5. Install the sanding belt as shown in Figure 8, and
center it on the rollers and in between the ceramic
limit switch levers.
6. Reinstall the steel spacer block, the sanding head
lock lever, and turn the lever clockwise to lock the
headstock.
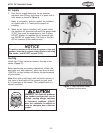
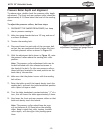
Sanding Belt Tensioning
When air is applied to the system (75 PSI), the switch
shown in
Figure 9 automatically sets the belt to the cor-
rect tension. When the air pressure is connected and the
switch is flipped up, the belt will automatically tighten
to the correct tension. Flipping the switch down will
immediately exhaust the air and release the belt ten
-
sion.
You must tension the sanding belt before starting the
sander, and de-tension the belt when sander is not in
use, or you will stretch the belt.
Figure 8. Installing sanding belt over
rollers. The arrows on the inside must
point in the same direction as belt
rotation.
Figure 9. Belt tension knob.