


-27-
W1751 25" Wide-Belt Sander
SERVICE
SERVICE
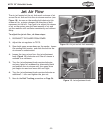
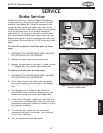
Figure 25. Brake assembly.
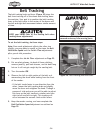
Figure 26. Brake caliper removed for
access to brake pads.
Brake Service
Check the brake rotor (shown in Figure 25) regularly
to make sure it is clean and the
pads are still in good
condition (
see Figure 26). Using the emergency stop
system for daily machine shutdown will wear out the
sanding belts and the brake
pads. Inspect for any grease
or oil on the brake rotor as oil reduces emergency
braking ability. To clean any lubricants from the rotor,
only use automotive brake parts cleaner and a dry rag.
Replace brake pads if they are contaminated with oil or
if you suspect they are failing. DO NOT re-use oily brake
pads!
To check the condition of the brake pads, do these
steps:
1. DISCONNECT THE SANDER FROM POWER, AND SHUT
OFF AND RELIEVE THE AIR PRESSURE!
2. Remove the lower-right motor-access panel.
3. Measure the thickness of each pad, if a pad is below
1
⁄8" (Figure 25), then replace both brake pads.
To replace the brake pads, do these steps:
1. DISCONNECT THE SANDER FROM POWER, AND SHUT
OFF AND RELIEVE THE AIR PRESSURE!
2. Use a 14mm wrench and remove the two caliper
anchor pin retaining nuts and washer (see
Figure
25).
3. Use locking pliers to clamp on the anchor pin
end and pull the pin from the caliper mount, and
remove the springs and caliper (see
Figure 26).
4. If the rotor is damaged, remove the rotor and have
it surfaced at a machine shop. Clean the rotor with
automotive brake parts cleaner and handle it with a
dry rag when installing.
5. To finish the job, install the new brake pads,
reassemble and mount the caliper, and reconnect
the air line if removed.
6. Test the emergency brake operation!
1
⁄8" Minimum
Anchor Pin
Rotor
Caliper